Ultimate Snow Cone Cupcakes Recipe: Fun & Easy Summer Treat
That first bite of a cherry snow cone on a sweltering July afternoon is basically a childhood rite of passage, and Snow Cone Cupcakes are the best way to bring that memory straight to your dessert table. This recipe gives you all the nostalgia and color of a real snow cone, packed into a soft, moist cupcake you can make in under 45 minutes. Get ready, because these are about to become the most requested treat at every cookout you host this summer.
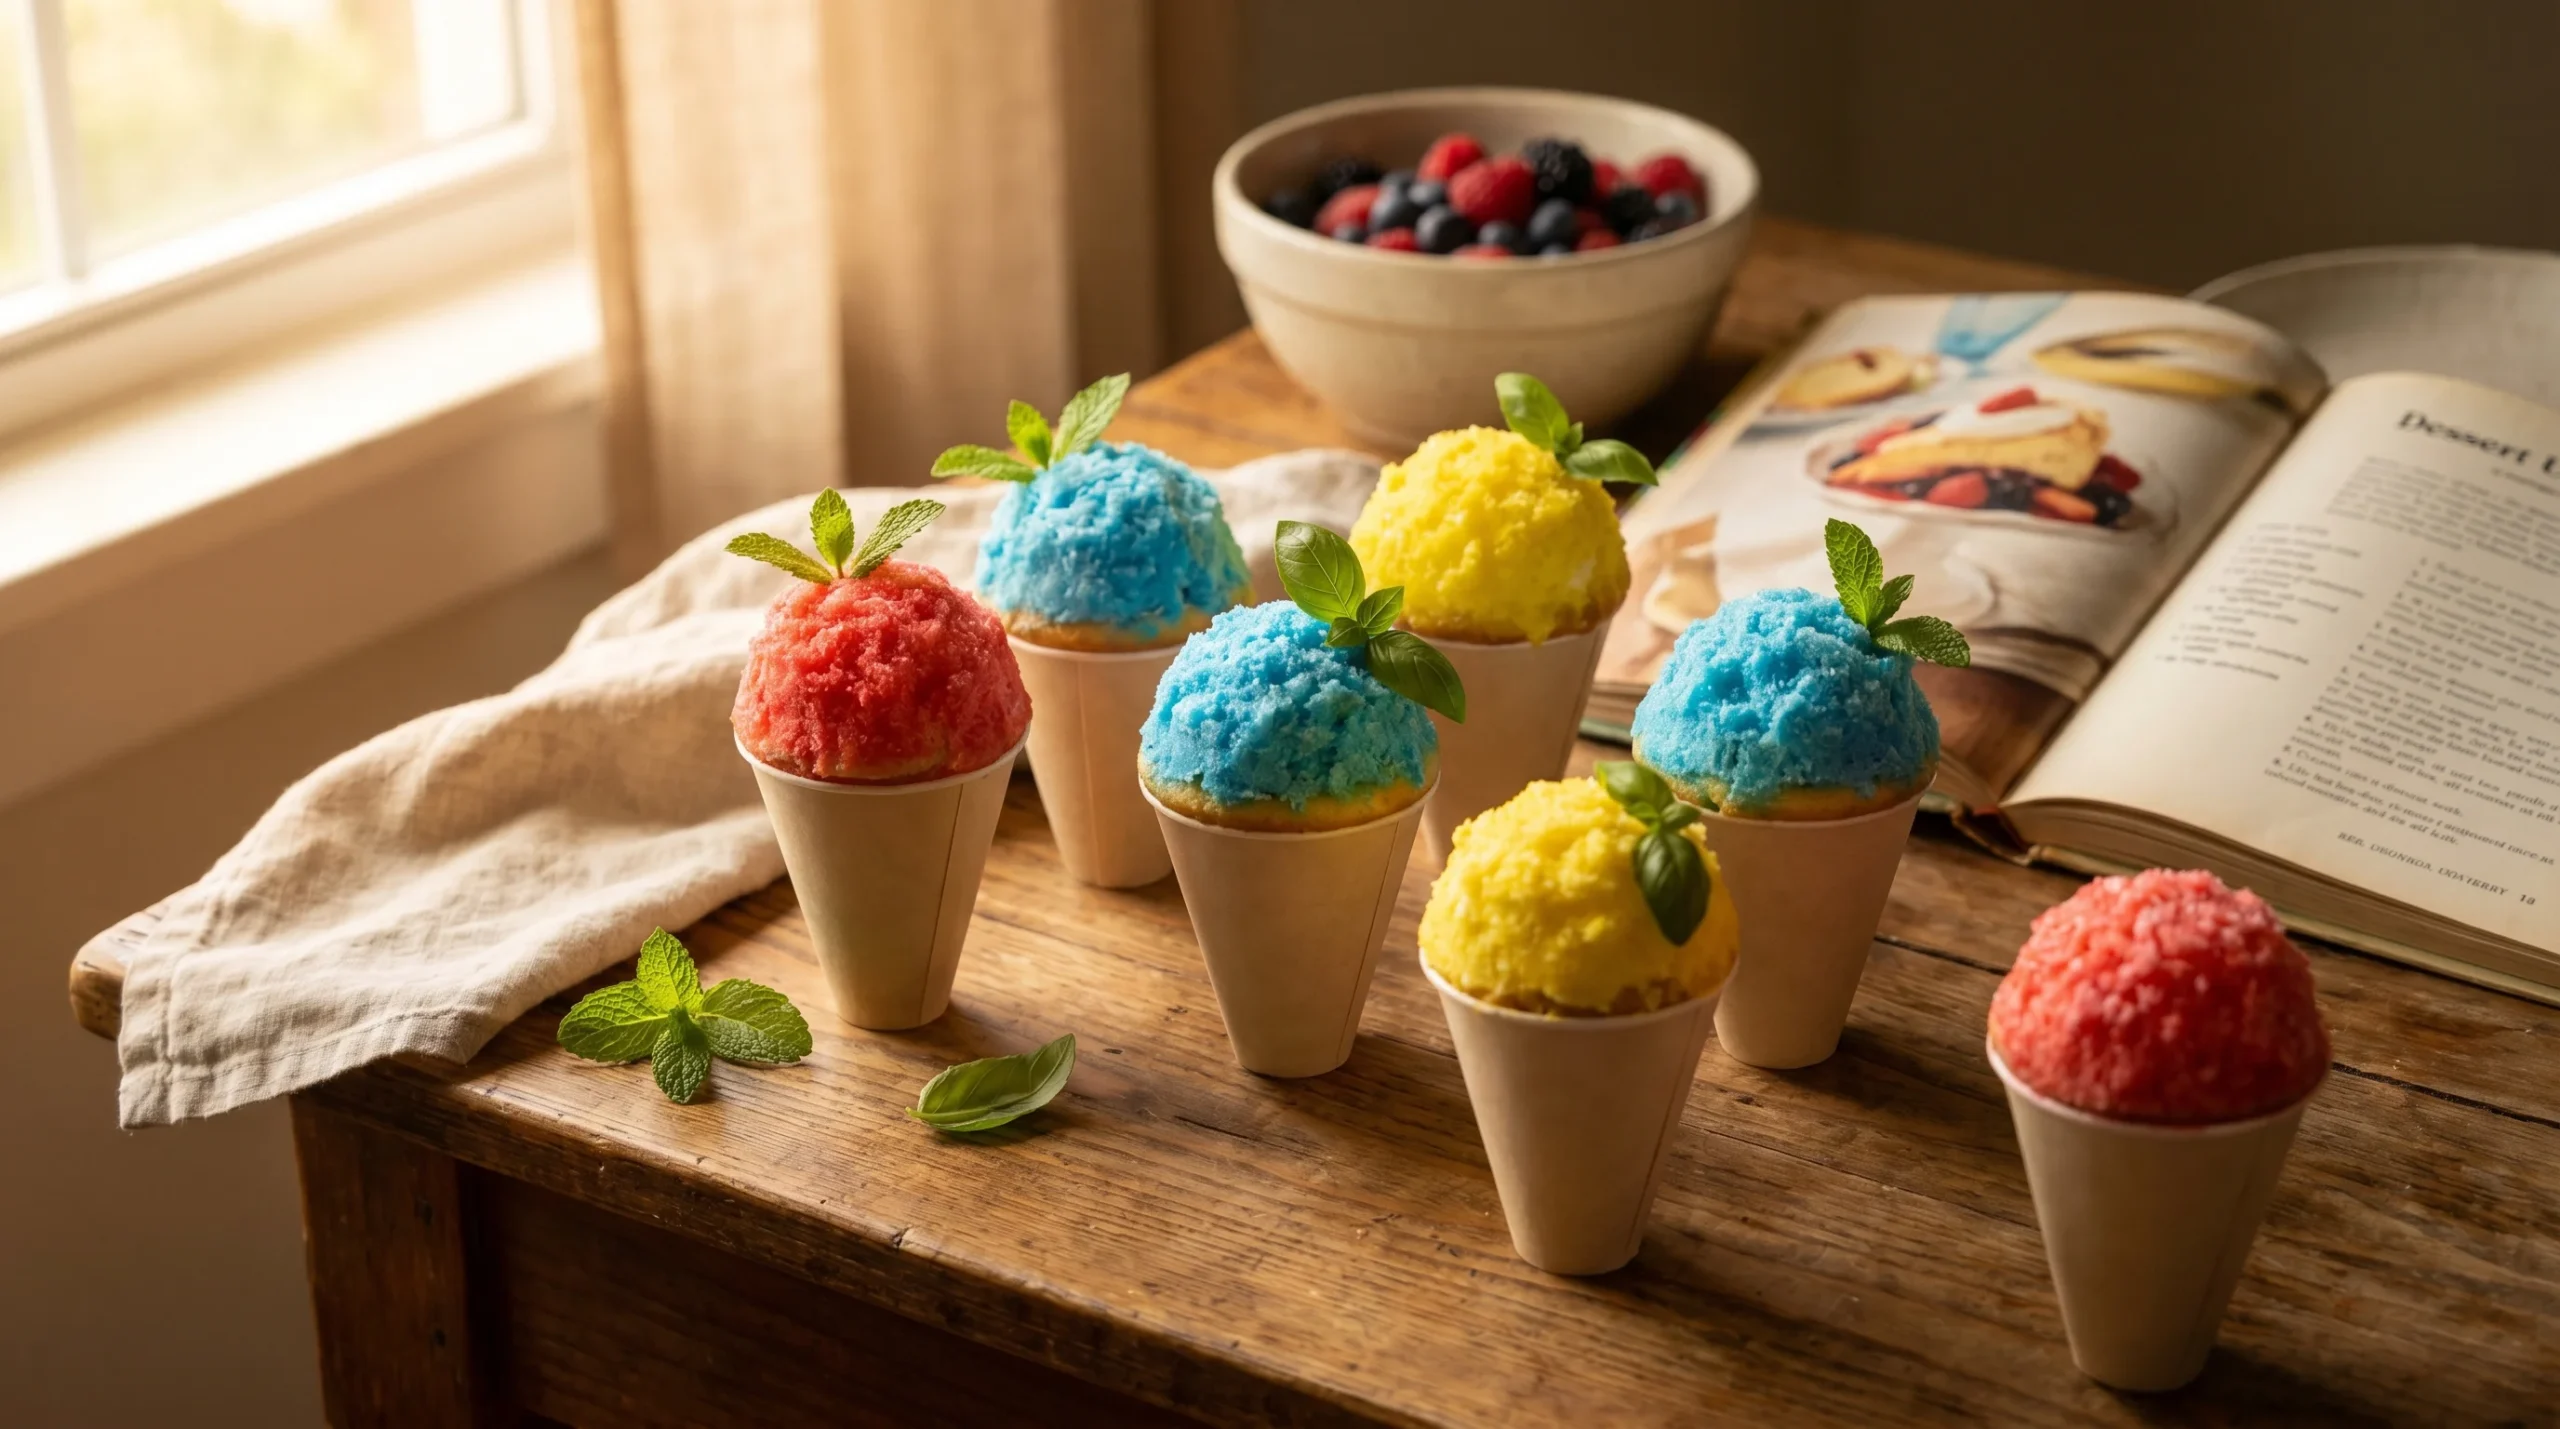
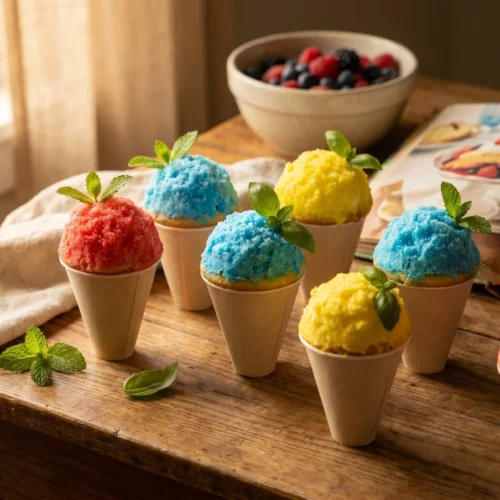
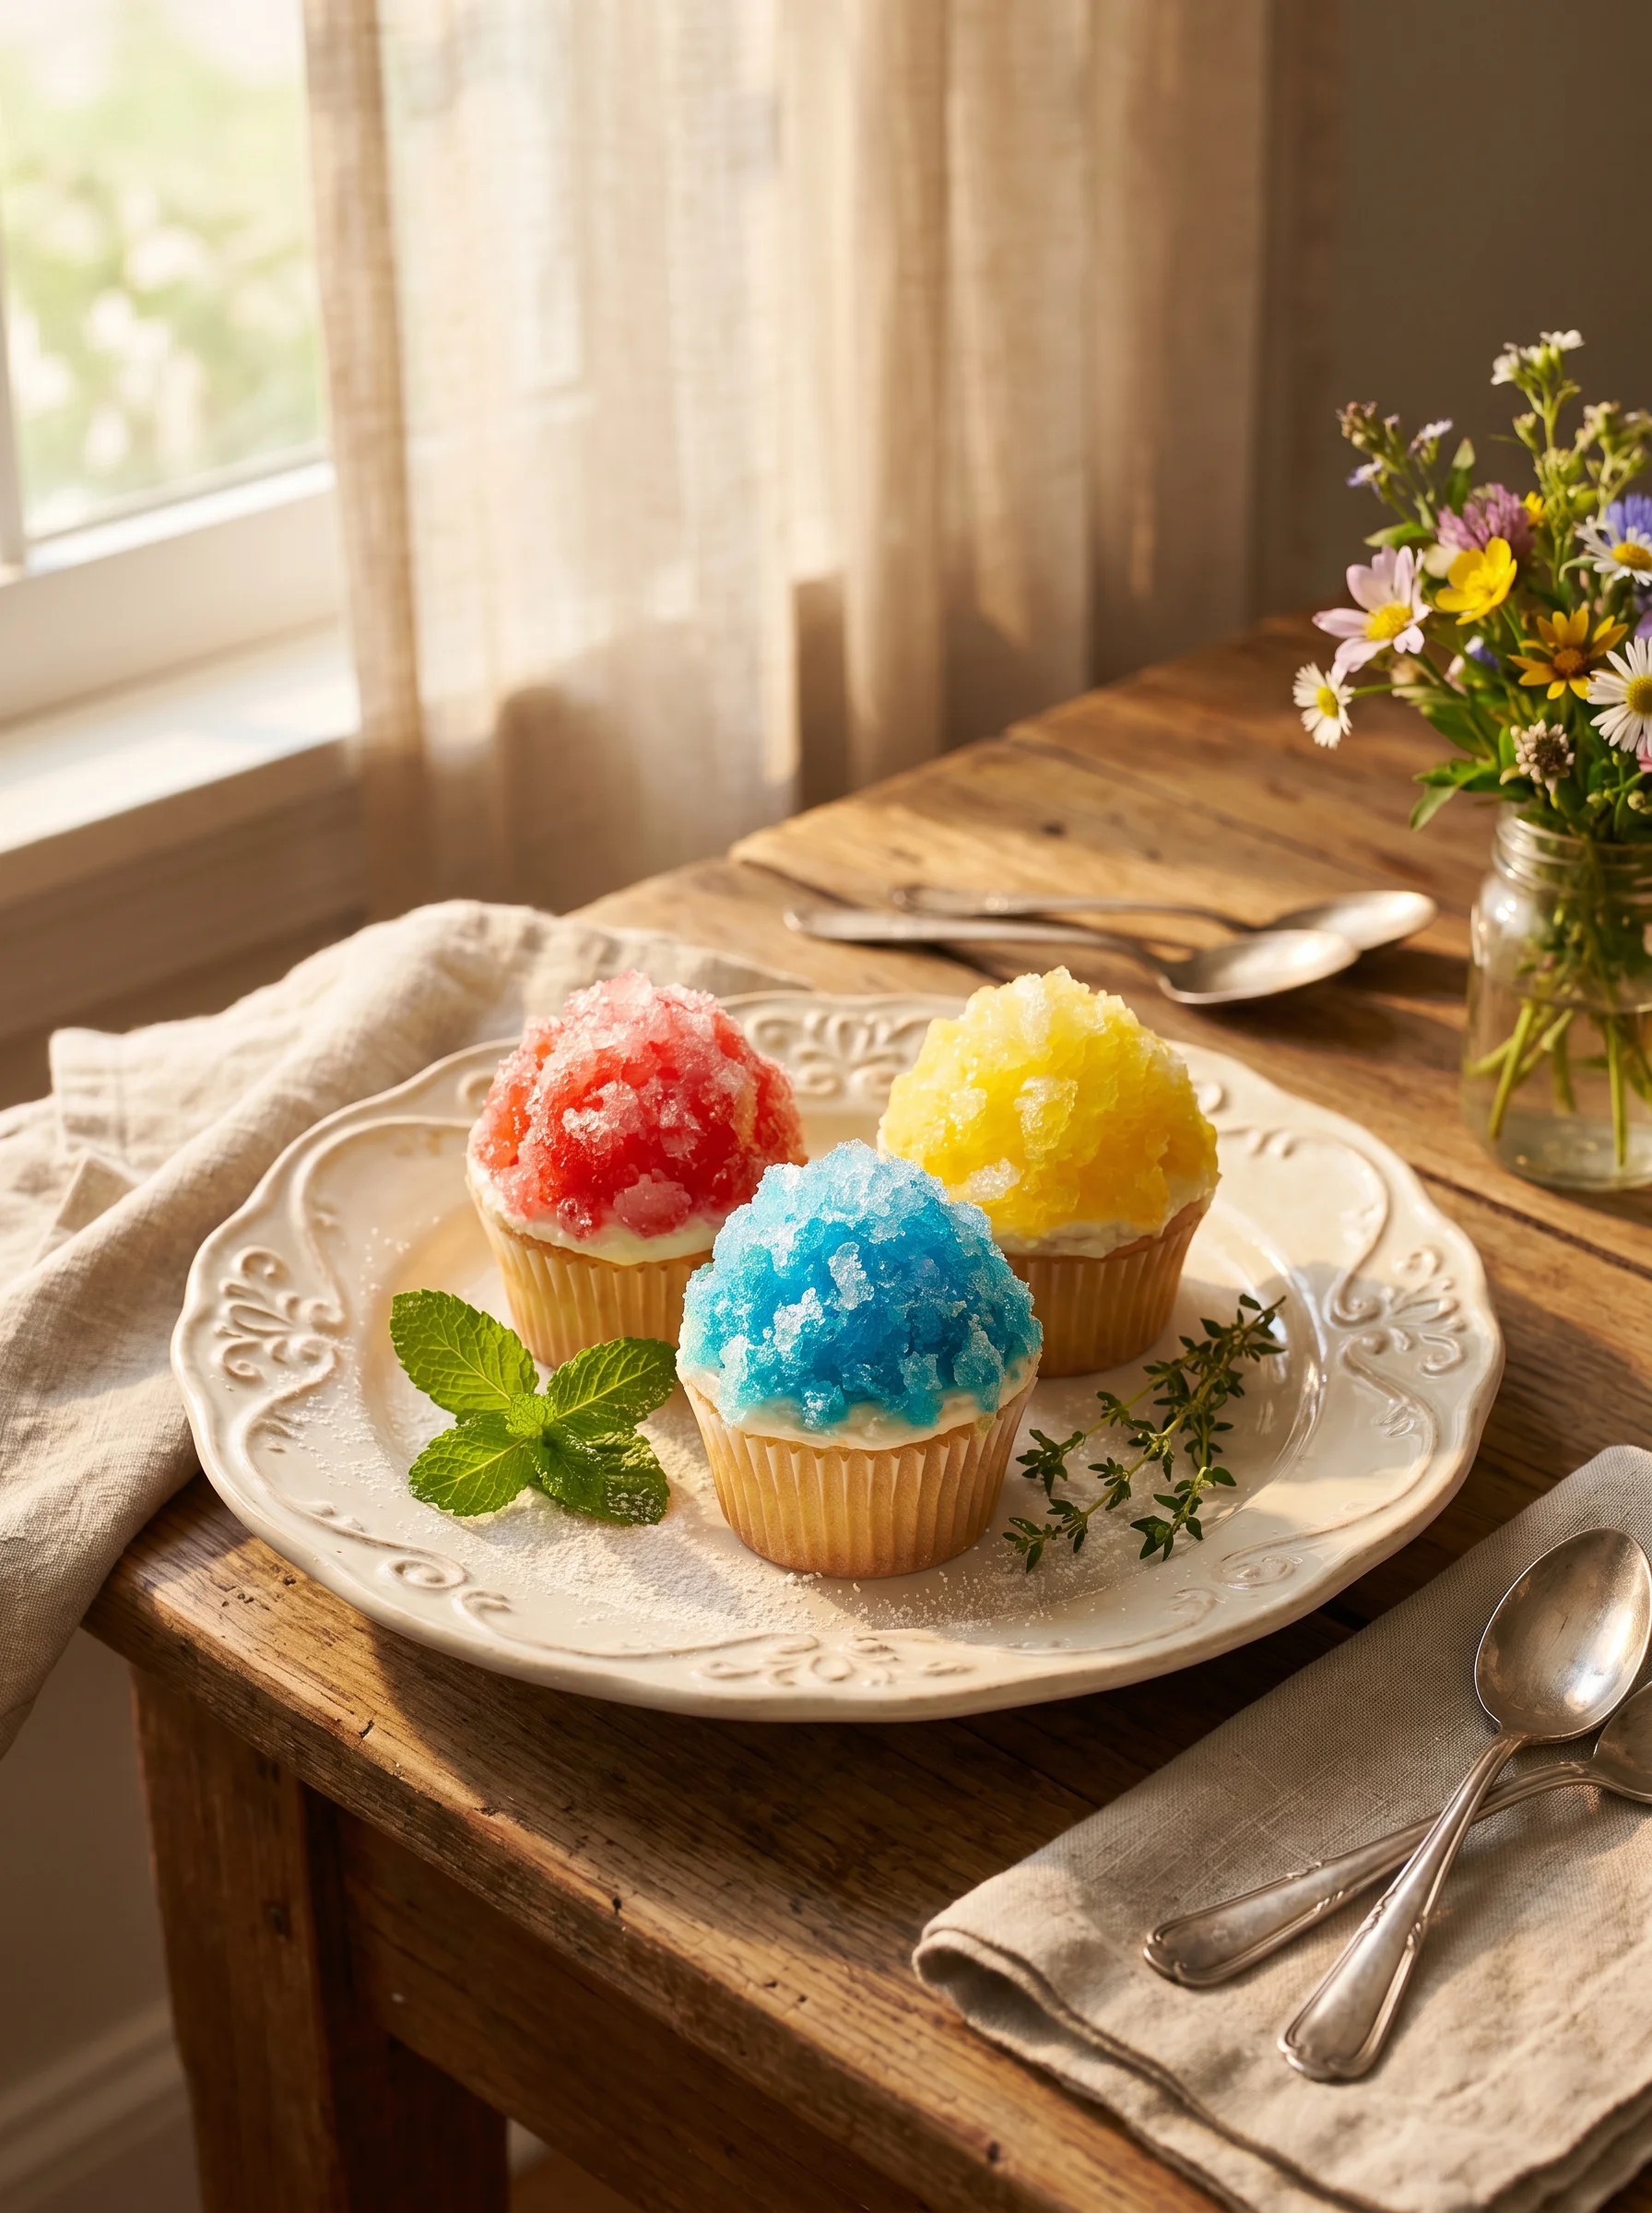
Snow Cone Cupcakes start with a fluffy vanilla or lemon cupcake base, topped with smooth buttercream frosting. Sprinkle crushed ice cream cones on top for that crunchy “shaved ice” texture, then drizzle with bold, colorful syrups like cherry, blue raspberry, and lemon. Add a mini paper straw and a pinch of edible glitter to complete the snow cone illusion. They’re fun, simple, and totally kid-approved.
Why Snow Cone Cupcakes Are Summer’s Easiest Dessert
Snow Cone Cupcakes win because they’re built for hot-weather parties. No ice machine, no messy cups, and absolutely no drips running down your hand. Just a gorgeous, colorful cupcake that looks like it took hours but actually didn’t.
The base recipe uses simple pantry staples. You don’t need a stand mixer, specialty tools, or anything fancy. A hand mixer and a standard muffin tin are all it takes.
These cupcakes are also perfect for kids, which means they’re perfect for Independence Day parties, neighborhood cookouts, and end-of-school celebrations. The bright colors alone will stop everyone in their tracks.
Save this pin for your next summer party plan, because you’ll want to come back to this recipe every single time the temperature hits 90 degrees and you need a dessert that actually matches the vibe.
One reason I love this recipe is flexibility. You can use a homemade vanilla batter or a boxed mix and get equally great results. I’ve used both in my baking classes in Kansas City and the crowd-pleasing factor is identical.
If you enjoy creative cupcake decorating for seasonal celebrations, our guide on festive gelatin snow globe cupcakes shows just how far you can take a themed cupcake concept.
How to Make Snow Cone Cupcakes
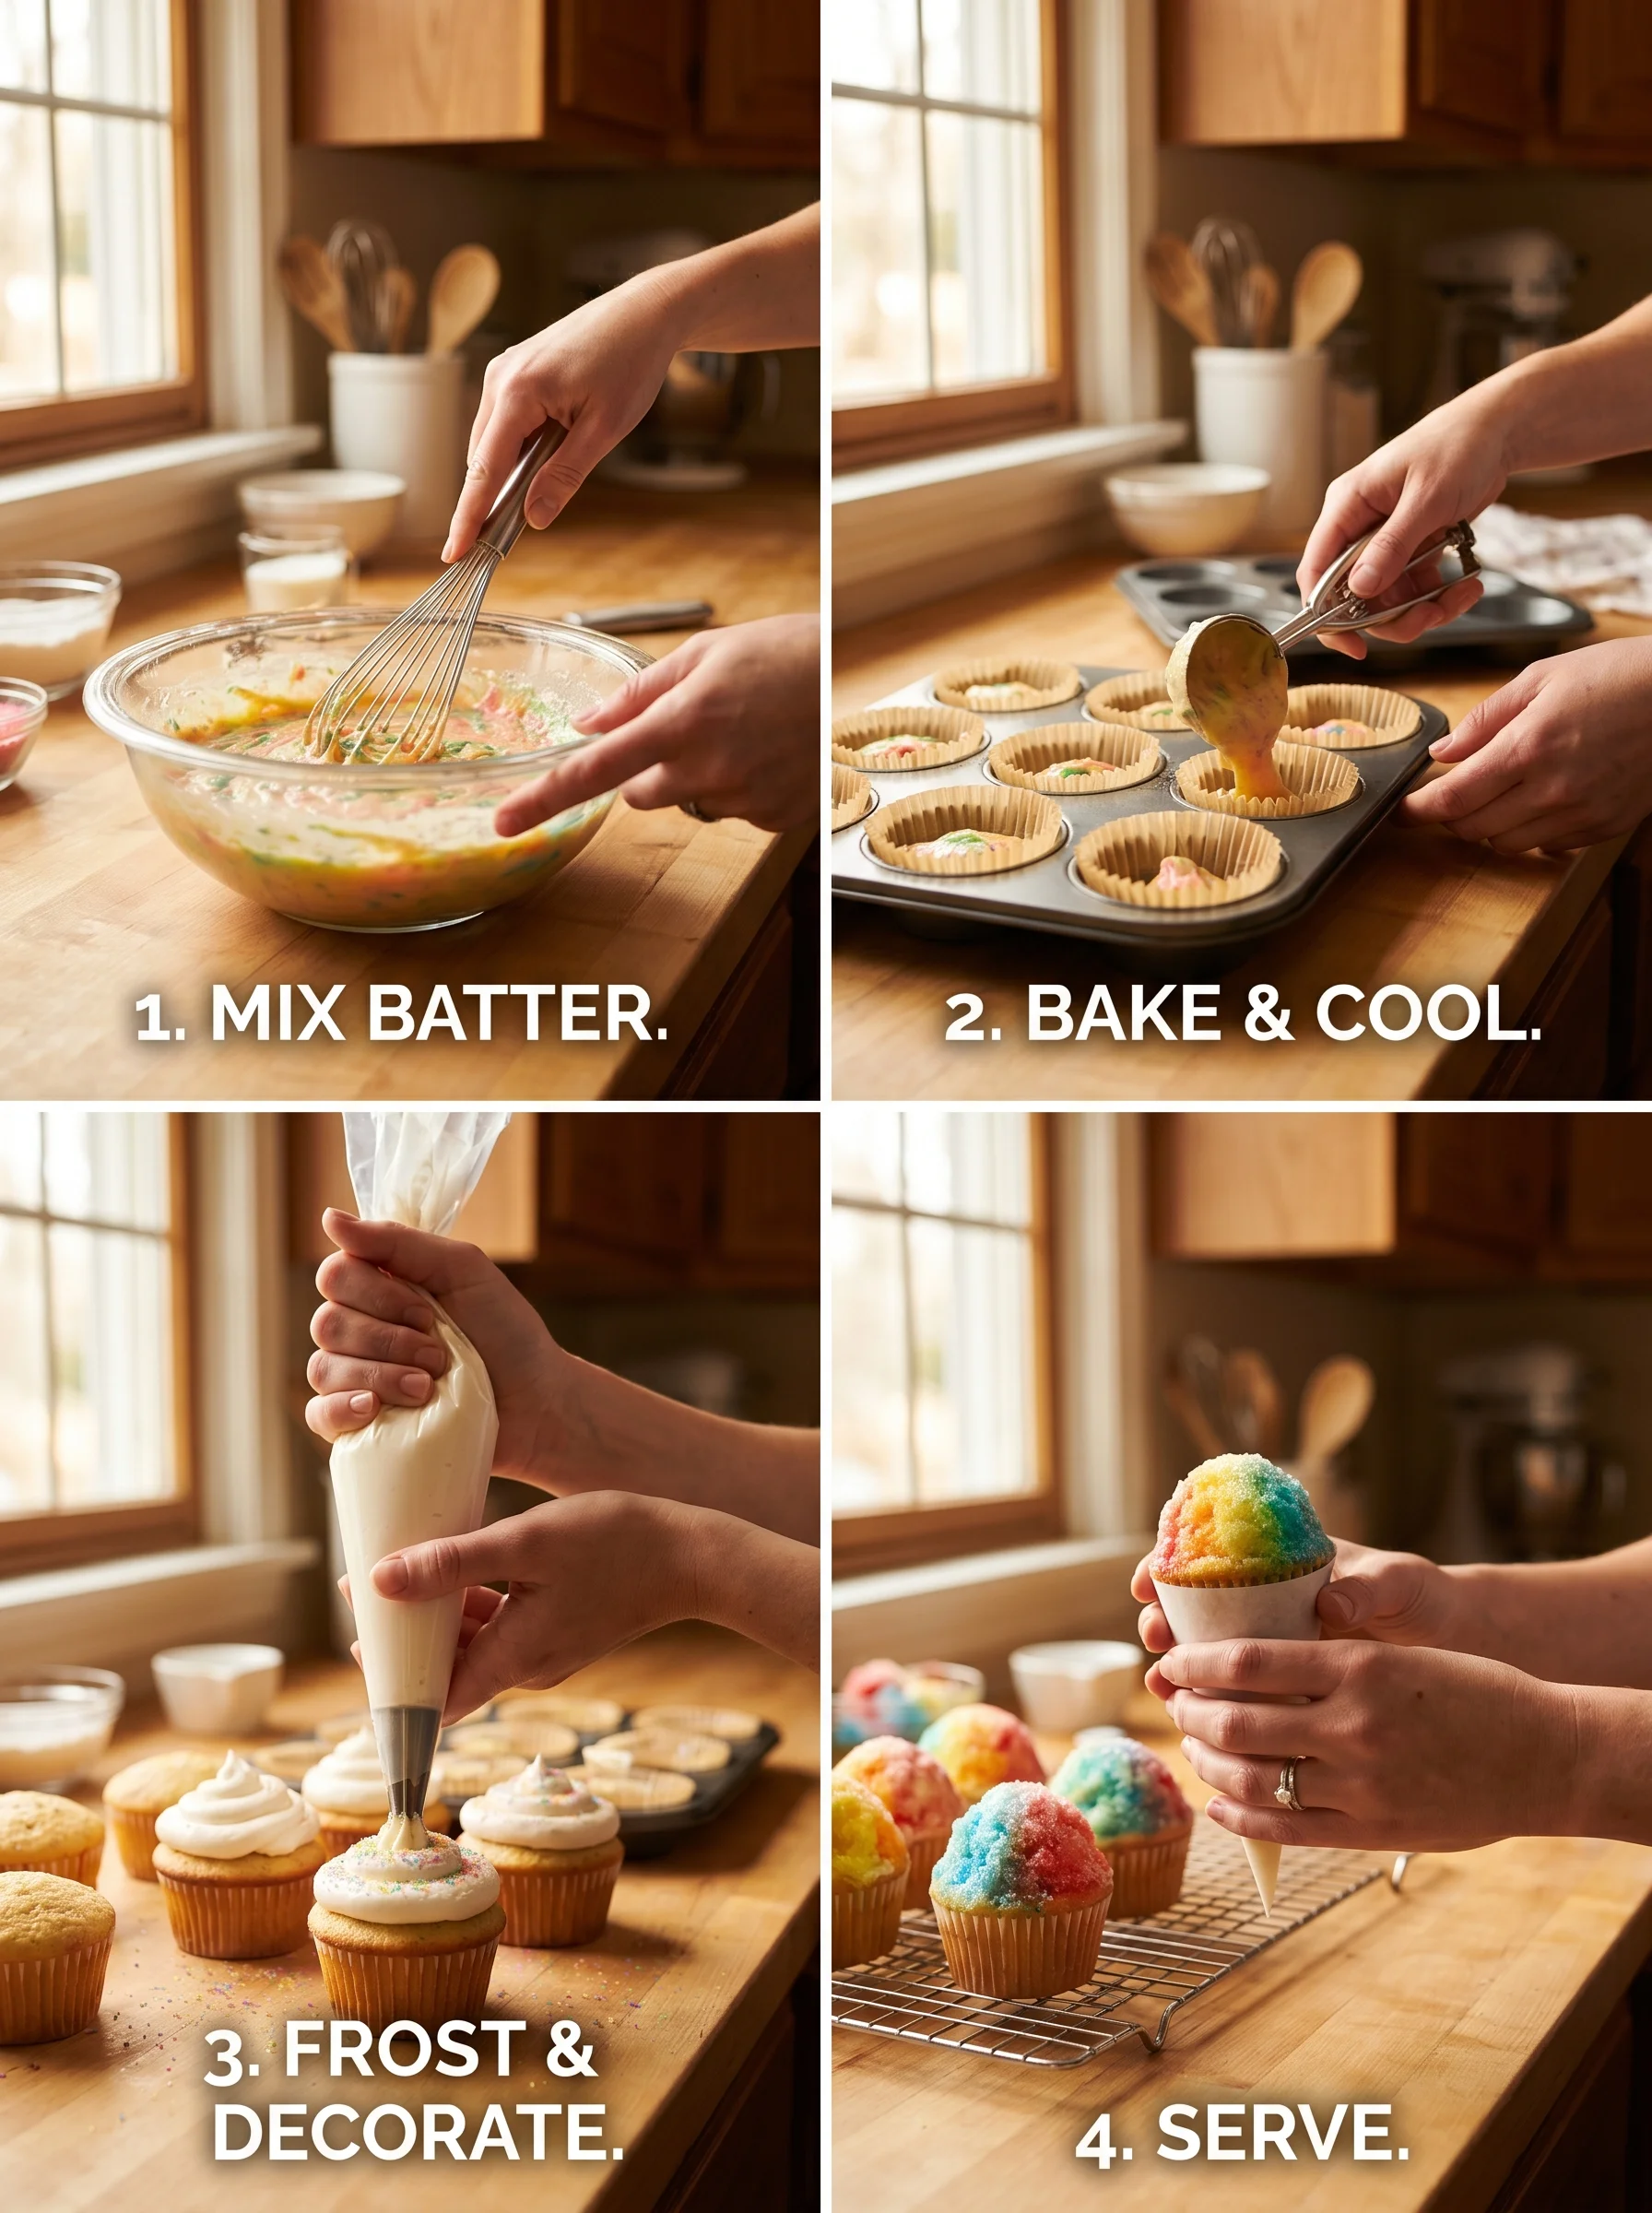
Making homemade Snow Cone Cupcakes is a four-part process: bake, cool, frost, top. It sounds simple because it is. Here’s the breakdown before we get to the full recipe card.
Step 1: Bake your vanilla or lemon cupcakes. Use a standard 12-cup muffin tin lined with colorful paper liners. Bake at 350°F for 18-20 minutes.
Step 2: Cool completely. Don’t rush this. Frosting on a warm cupcake is a disaster. Give them at least 30 minutes on a wire rack.
Step 3: Pipe your buttercream. Use a round tip for a smooth dome or a star tip for texture. The frosting is the “snow” in your snow cone.
Step 4: Add the toppings. Crushed ice cream cones go on first, then the syrup drizzle, then the fun extras. Timing here matters, and I’ll explain exactly why in the section below.
Snow Cone Cupcakes Recipe
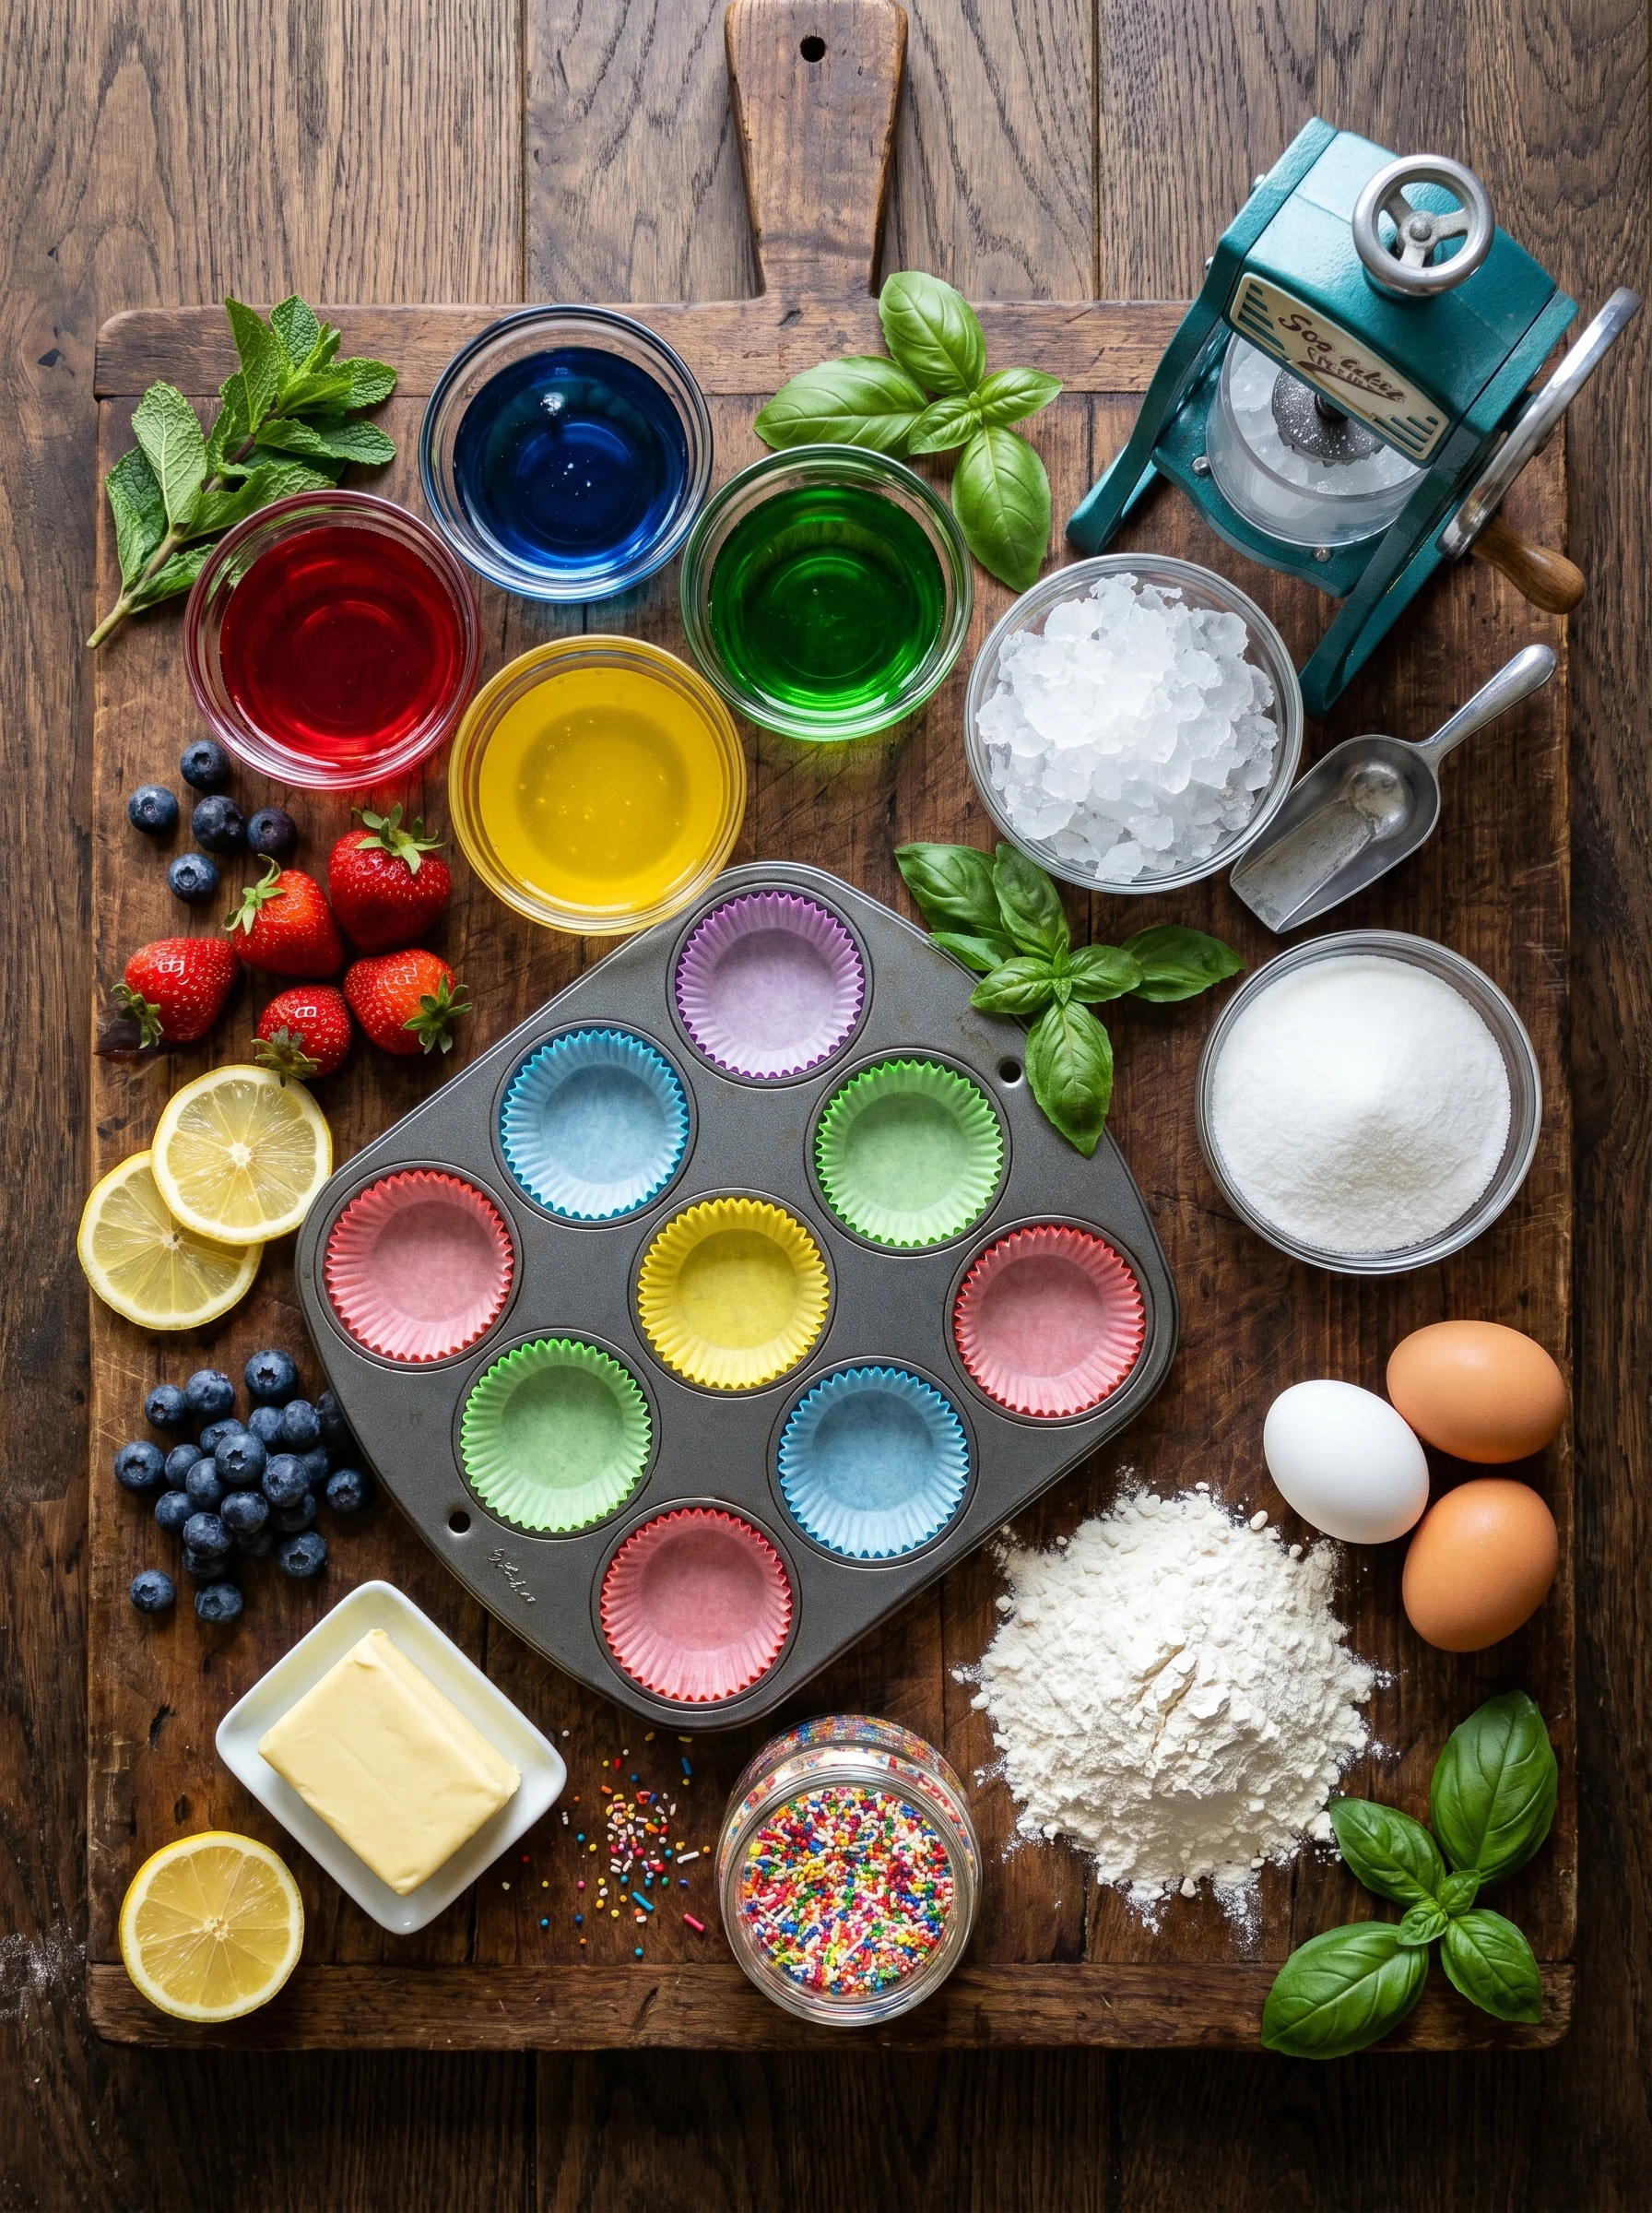
Ingredients
- 1 and 1/2 cups all-purpose flour
- 1 cup granulated sugar
- 1/2 cup unsalted butter (softened)
- 2 large eggs (room temperature)
- 1/2 cup whole milk
- 1 tsp pure vanilla extract
- 1 and 1/2 tsp baking powder
- 1/4 tsp salt
Instructions
- Preheat the oven to 350°F. Line a 12-cup muffin tin with paper liners.
- Make the batter: Beat butter and sugar together on medium speed for 2-3 minutes until light and fluffy. Add eggs one at a time, beating well after each. Mix in vanilla extract.
- Add dry ingredients: Sift together flour, baking powder, and salt. Add to the butter mixture in three parts, alternating with the milk. Start and end with the flour mixture. Mix until just combined.
- Fill the liners: Divide batter evenly among the 12 cups, filling each about 2/3 full.
- Bake for 18-20 minutes, until a toothpick inserted in the center comes out clean.
- Cool completely on a wire rack, at least 30 minutes.
- Make the buttercream: Beat softened butter for 2 minutes until creamy. Add powdered sugar one cup at a time. Add heavy cream, vanilla, and salt. Beat on high for 3 minutes until fluffy and smooth.
- Frost the cupcakes: Pipe a generous dome of buttercream onto each cooled cupcake using a large round or star tip.
- Add the toppings: Press a small handful of crushed ice cream cone pieces gently into the frosting. Drizzle one or two colors of syrup over the top.
- Finish and serve: Add a mini paper straw, a pinch of edible glitter, and a few sprinkles. Serve immediately for the best texture.
Notes
The Secret to Shaved Ice Texture That Won’t Melt
The whole visual magic of Snow Cone Cupcakes comes down to that crumbly, crystalline topping that mimics shaved ice. Getting it right is easier than you think, but there are two things you absolutely need to know.
First, crush your ice cream cones at the last possible moment. Pre-crushed cones sitting in a bowl on a humid summer day will go soft within 15 minutes. Crush them fresh, right before you top the cupcakes.
Second, the size of the crumble matters. You want pieces ranging from fine crumbs to small chunks, about 1/4 inch max. This mix of textures looks the most like real shaved ice and gives you a better crunch in every bite.
For easy Snow Cone Cupcakes at a big party, I recommend crushing your cones inside a zip-lock bag using a rolling pin. Takes about 30 seconds and zero cleanup.
The buttercream also plays a structural role here. A stiff, full-fat American buttercream acts as a barrier between the cupcake and the toppings. It holds the crushed cone pieces in place and slows syrup absorption.
Thin or whipped frostings will absorb syrup almost instantly and turn the whole top layer into a soggy mess within minutes. Go for a thick, dense buttercream every single time.
How to Keep the Toppings from Getting Soggy
Apply the crushed cone pieces and syrup drizzle only right before serving. This is the single most important rule for keeping the best Snow Cone Cupcakes crispy and visually stunning.
If you’re making these for a party and need a little flexibility, here’s what works: frost the cupcakes up to 4 hours ahead and refrigerate them uncovered. Pull them out 20 minutes before guests arrive, then top them right at serving time.
Storing toppings separately is also smart. Keep crushed cones in a sealed bag and syrups in small squeeze bottles. Assemble in under 2 minutes per batch when you’re ready.
| Topping Type | Time Before Soggy | Best Strategy |
|---|---|---|
| Crushed sugar cones | 20-30 min | Add at serving time |
| Crushed waffle cones | 30-45 min | Add at serving time |
| Graham crackers | 10-15 min | Add immediately before serving |
| Flavored syrup drizzle | 15-20 min | Drizzle last, serve fast |
Best Flavor Combos Beyond Cherry and Blue Raspberry
Cherry and blue raspberry are the classic Snow Cone Cupcakes combination. Everyone knows them, everyone loves them. But if you want to stand out at a summer party, there’s a whole world of flavor pairings worth exploring.
Tropical combinations are having a serious moment right now. Pineapple syrup over a coconut-scented buttercream is absolutely stunning, and it pairs beautifully with a lemon cupcake base. Think summer in Hawaii, not just the county fair.
Watermelon and lime is another duo that works surprisingly well. The tartness of lime cuts through the sweet watermelon syrup and makes the whole thing taste genuinely refreshing, not just sugary.
For Snow Cone Cupcakes for kids who are a little more adventurous, try a “rainbow” approach: three different syrups drizzled in stripes across the frosting. Cherry on one side, blue raspberry in the middle, lemon on the other. It’s as fun to look at as it is to eat.
If you want a lighter frosting option that pairs well with fruit syrups, our recipe for smooth maple frosting cupcakes shows great techniques for adjusting frosting sweetness without losing structure.
What Flavors Work Best for Snow Cone Cupcakes
The best flavors for Snow Cone Cupcakes follow one simple rule: bright, bold, and fruit-forward. Mild or subtle flavors get lost under the sweetness of the syrup.
- Cherry: The all-time classic. Use a bright red Torani or Monin cherry syrup.
- Blue Raspberry: Bold, slightly tart, and the best color payoff of any syrup.
- Lemon: Sharp and citrusy, perfect for cutting through sweet frosting.
- Pineapple: Tropical and fragrant, pairs perfectly with coconut buttercream.
- Watermelon: Light and summery, best used as a light drizzle, not a pour.
- Grape: Deep, bold color and a sweet punch kids absolutely love.
For the cupcake base itself, vanilla is the neutral canvas that lets the syrups shine. Lemon adds a tiny bit of brightness that makes the whole dessert taste more complex without competing with the toppings.
Make-Ahead Magic: When to Frost and When to Top
One of the best things about Snow Cone Cupcakes with cake mix or from scratch is that most of the work can happen well ahead of time. You don’t need to be baking at noon to have perfect cupcakes by 3 PM.
The cupcakes themselves can be baked 1 to 2 days in advance. Store them in an airtight container at room temperature and they’ll stay perfectly moist. Don’t refrigerate unfrosted cupcakes because the fridge dries them out fast.
Buttercream can also be made 2 to 3 days ahead. Store it in an airtight container in the fridge, then bring it to room temperature and re-whip it for 1 minute before piping. It’ll be just as fluffy as fresh.
How to make Snow Cone Cupcakes work for a big party crowd? Set up a DIY topping station. Put crushed cones, three or four syrups in squeeze bottles, sprinkles, and edible glitter in small bowls. Let guests top their own cupcakes. It’s interactive, low-stress for you, and genuinely fun for everyone.
For anyone watching their sugar intake, our collection of delicious sugar-free cupcake recipes includes great low-sugar frosting ideas that work well as a base for this same concept.
Can I Make Snow Cone Cupcakes Ahead of Time
Yes, and here is the exact timeline that works best:
- 2 days before: Bake cupcakes. Cool completely. Store in an airtight container at room temperature.
- 1 day before: Make buttercream. Store covered in the fridge.
- Day of, 1-2 hours before: Re-whip frosting. Pipe onto cupcakes. Refrigerate frosted cupcakes uncovered.
- 30 minutes before serving: Pull cupcakes from fridge. Let them come to room temperature.
- Right before serving: Add crushed cones, syrup drizzle, sprinkles, and straws.
This timeline gives you maximum flexibility without sacrificing any quality. The toppings stay crisp, the frosting stays fluffy, and you get to actually enjoy the party instead of stressing in the kitchen.
Why Trust This Recipe
I’m Benjamin, a baking educator and former bakery owner based in Kansas City, Missouri. I’ve been teaching people how to bake with precision and confidence for years, and summer cupcake recipes are some of my absolute favorites to workshop in class. This Snow Cone Cupcakes recipe has been tested, tinkered with, and adjusted based on real feedback from real home bakers. I know what works and, more importantly, I know what doesn’t.
Frequently Asked Questions
Find answers to common questions
Ready to Make the Best Snow Cone Cupcakes This Summer
Homemade Snow Cone Cupcakes are the kind of dessert that makes a whole party feel special. They’re colorful, nostalgic, endlessly customizable, and genuinely easy to pull off even on a busy summer afternoon. Whether you’re making them for a Fourth of July cookout or just because it’s Tuesday and it’s hot outside, these cupcakes deliver every single time.
Browse more delicious recipes at jscupcakes.com. You can also learn more about our team on the About page, or reach out directly through the Contact page if you have questions or recipe requests.
About the Author: Benjamin James Batterson is a baking educator and former bakery owner from Kansas City, Missouri. With years of experience teaching culinary science and reliable baking methods, Benjamin specializes in making technically precise recipes approachable for home bakers of every skill level.
What’s your favorite way to make Snow Cone Cupcakes? Do you go classic cherry and blue raspberry, or do you have a wild tropical combo that everyone goes crazy for? Drop your answer in the comments below, I read every single one!
Some links in this article are affiliate links. If you purchase through them, I may earn a small commission, at no extra cost to you. Thank you for your support!

Ben is a 41-year-old baking educator and former bakery owner from Kansas City, Missouri. With a culinary degree and years of hands-on experience, he specializes in teaching approachable, science-based baking. He once recreated a 17th-century cupcake recipe for a historical food documentary.