
Table of Contents
Most Halloween recipes require the patience of a saint and the artistic talent of a Disney animator. I don’t have either. After one too many Pinterest fails that looked more like a crime scene than a cute ghost, I declared war on complexity.
I was on a mission to find truly easy Halloween cupcake designs that deliver maximum spooky impact with minimum effort. Forget sculpting with fondant for three hours. We’re achieving viral-worthy results with stuff you probably already have in your kitchen.
These designs are so simple, you can whip them up while binge-watching your favorite horror movies. Your secret is safe with me.
Remember being a kid and how magical the simplest Halloween crafts felt? That’s the vibe we’re capturing.
These easy Halloween cupcake designs tap directly into that nostalgic joy without the adult-level stress. They’re forgiving, fast, and frankly, a whole lot of fun to make. Who says you need a pastry degree to create something adorable and slightly creepy?
The best part is watching people’s faces light up when they see them. They’ll think you slaved for hours, and you get to just smile and nod knowingly.
Ingredients
Before we get to the decorating, you need a solid base. I use my favorite one-bowl chocolate cupcake recipe because it’s practically foolproof.
The real magic, however, is in the decorating arsenal. Raid your pantry and get ready to be resourceful.
- 12 baked and cooled cupcakes (any flavor you love)
- 1 batch of vanilla or chocolate buttercream frosting
- Orange, black, and green gel food coloring
- Candy eyeballs (the undisputed MVP of easy Halloween cupcake designs)
- Oreo cookies
- Black decorating icing in a tube (for web details)
- Mini pretzel sticks
- Chocolate sprinkles
Step-by-Step Instructions
- Divide your frosting into separate bowls. Tint one bowl orange, one black, and leave one white. This is your color palette for all the designs. Pro tip: Use gel food coloring for vibrant colors without thinning your frosting.
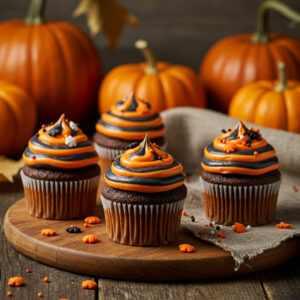
- Frost your first set of cupcakes with a smooth layer of orange frosting. These will be your pumpkins and cats. A simple offset spatula makes this a breeze, but a butter knife works perfectly fine.
- Create the classic spiderweb cupcake. Frost a cupcake with white buttercream. Take the black tube icing and draw a small spiral starting from the center. Immediately, drag a toothpick from the center out to the edge in straight lines to create the web effect. It’s shockingly effective for zero skill required.
- Make the mummy cupcakes. Frost a cupcake with white buttercream. Use a piping bag with a small round tip (or a ziplock bag with the corner snipped) to squiggle lines of frosting across the top, leaving a small gap for the eyes. Press two candy eyeballs into the gap. Instant ancient Egypt.
- Assemble the black cat cupcakes. For an orange-frosted cupcake, use mini pretzel sticks for ears. Add two green candy eyes and use the black tube icing to draw a little mouth and whiskers. It’s almost illegally cute.
- Create the Frankenstein cupcakes. Frost a cupcake with green buttercream. Use chocolate sprinkles for the hair and candy eyes. Finally, use the black tube icing to draw the iconic forehead stitches and mouth.
Storage Instructions

Your spooky masterpieces need a good home until the party starts.
For short-term storage, an airtight container at room temperature is perfect for up to two days. If you need to store them longer, pop the container in the fridge. For true make-ahead magic, you can freeze the undecorated cupcakes for up to three months.
Thaw overnight and decorate the day of your event. This is the ultimate time-saving hack for a stress-free Halloween.
Why You’ll Love This Easy Halloween Cupcake Designs
- Major Crowd-Pleaser with Minimal Effort: These designs look incredibly impressive but are deceptively simple. You get all the credit for a fraction of the work.
- Perfect for Kitchen Newbies and Kids: This is a fantastic activity to do with little ones. No complicated techniques, just creative fun and a guaranteed mess.
- Incredibly Budget-Friendly: We’re using common baking staples and affordable candy. You won’t need to buy any expensive specialty tools or ingredients.
Common Mistakes to Avoid
- Using warm cupcakes. The frosting will melt into a puddle of sadness. Let them cool completely, IMO.
- Skimping on the candy eyeballs. Buy the big bag. You will use them for everything, trust me.
- Using liquid food coloring. It waters down your frosting and gives you pastel, not spooky, colors. Gel is non-negotiable.
- Overcomplicating it. Stick to the simple shapes and let the candy do the talking. This isn’t the Great British Bake Off.
Alternatives and Variations
Dietary restrictions? No problem. Use your favorite gluten-free cupcake mix as the base.
For a vegan version, use plant-based butter and milk in your frosting and check that your candies are vegan-friendly. Not a fan of buttercream? A simple cream cheese frosting works beautifully with these designs.
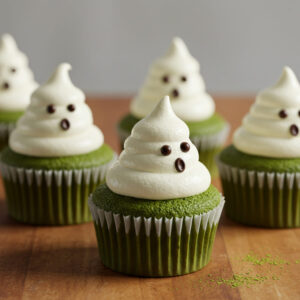
You can also create ghost cupcakes using white frosting and a ghost-shaped peep or a dollop of frosting with two mini chocolate chip eyes.
FAQs
Can I freeze these decorated cupcakes?
You can, but the decorations might get a little weepy upon thawing. I highly recommend freezing the cupcakes naked and decorating them the day you plan to serve them for the freshest look.
What’s the best substitute for candy eyeballs?
If you can’t find candy eyeballs, use mini chocolate chips (pointy side down) or small dabs of white frosting with a mini chocolate chip pupil. It works in a pinch!
How long do these cupcakes stay fresh?
Stored in an airtight container at room temperature, they are perfect for 2 days.
In the fridge, they’ll last for about 4-5 days. The frosting might dry out a bit, but they’ll still taste great.
Is this recipe kid-friendly?
Absolutely! This is one of the most kid-friendly baking projects ever.
They can handle most of the decorating steps themselves, which makes for a fantastic and memorable Halloween activity.
Can I prep the components ahead of time?
Yes! Bake and freeze the cupcakes up to a month ahead. You can also make the frosting and store it in the fridge for a week, or freeze it for three months.
Just let it come to room temperature and re-whip before decorating.
Final Thoughts
This approach to easy Halloween cupcake designs has completely changed my holiday baking. It’s taken the pressure off and brought the fun back. I hope these ideas inspire you to get creative and embrace the simple, spooky, and sweet side of Halloween.
Give these a try and watch your party guests be utterly bewitched. Don’t forget to tag me in your photos—I live for your creations!

Ben is a 41-year-old baking educator and former bakery owner from Kansas City, Missouri. With a culinary degree and years of hands-on experience, he specializes in teaching approachable, science-based baking. He once recreated a 17th-century cupcake recipe for a historical food documentary.