Table of Contents
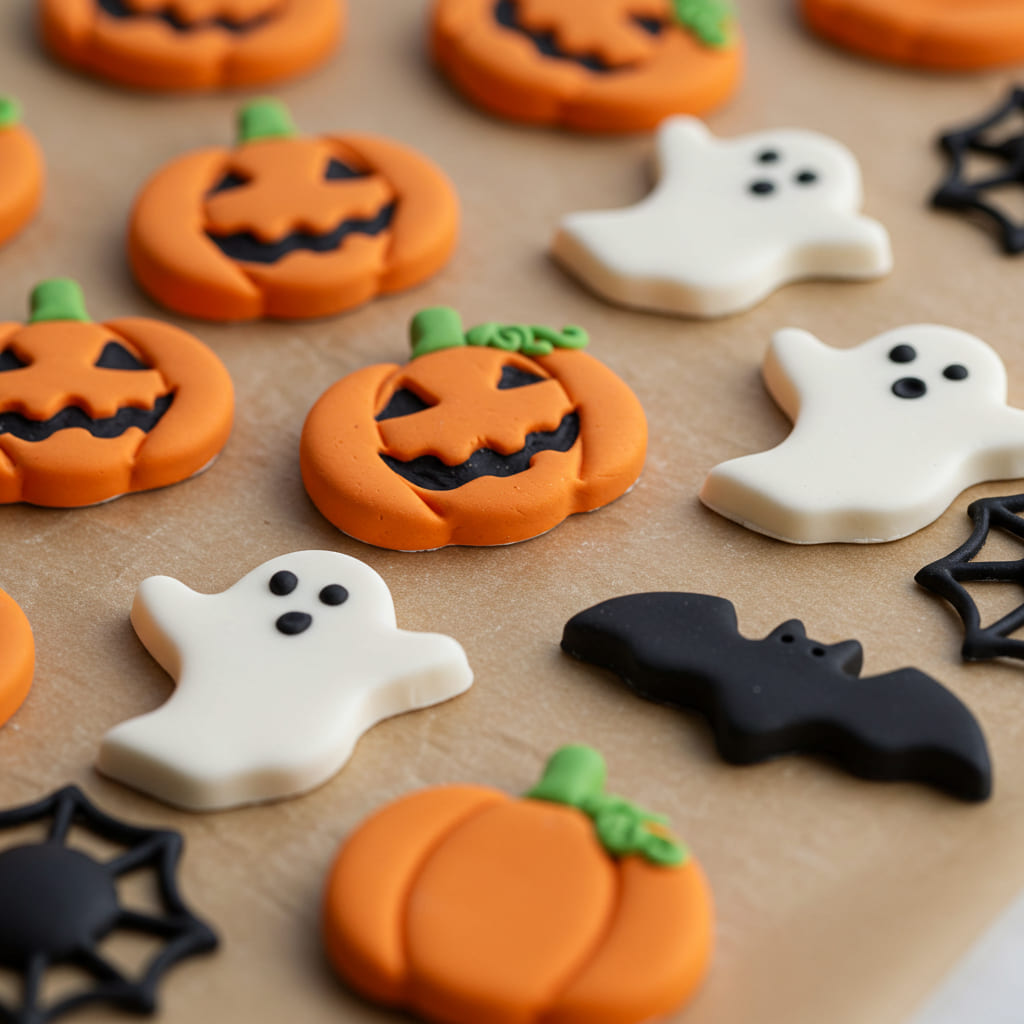
I used to think Halloween fondant toppers were the final boss of baking. You know, the kind of project that makes you question all your life choices. I’d see those perfect little ghosts and pumpkins online and my own lopsided creations looked like they’d already been through a haunt.
Then I cracked the code. It’s not about being a pastry Picasso. It’s about a simple, forgiving method that actually works.
These Halloween fondant toppers are your secret weapon for transforming basic treats into spooky masterpieces without the drama.
What’s the secret sauce? It’s not magic, I promise. It’s the fact that this recipe for Halloween fondant toppers is intentionally un-fussy.
We’re not building a structurally sound gingerbread house here. We’re making adorable, slightly spooky decorations that taste good. Remember the joy of play-doh as a kid?
This is the gourmet, edible version of that. It’s nostalgic, it’s creative, and it’s surprisingly therapeutic. Who knew rolling out tiny bats could be a better stress reliever than a meditation app?
Ingredients
Gathering your ingredients is the first step to fondant glory.
You might already have most of this in your pantry. The key is the marshmallows—they’re the cheat code that makes this fondant so pliable and less likely to taste like sweetened cardboard.
- 1 (10 oz) bag of mini marshmallows
- 2 tablespoons water
- 1 teaspoon vanilla or almond extract (vanilla is classic, almond is elite)
- 4 cups powdered sugar, plus more for dusting
- Gel food coloring in Halloween colors (orange, black, green, purple)
- Shortening for greasing your hands and surface
Step-by-Step Instructions
- Melt the marshmallows. Combine marshmallows and water in a large, microwave-safe bowl. Microwave in 30-second bursts, stirring well each time. You want it smooth and lava-like, not burnt.
- Flavor and color. Stir in your extract immediately. This is also the time to stir in your gel food coloring if you’re making one solid color batch. For multiple colors, we’ll divide it later.
- Knead in the sugar. Gradually add the powdered sugar to the marshmallow goo. It will be a sticky, glorious mess. This is where the trust begins.
- Get your hands dirty. Grease your hands and a clean surface with shortening. Turn the fondant out and knead it like bread for 5-8 minutes. Incorporate the rest of the sugar until it’s smooth and pliable, not sticky.
- Divide and color. If you didn’t color it all at once, divide the fondant and knead in different gel colors for each portion. Wear gloves unless you want Smurf hands for a week.
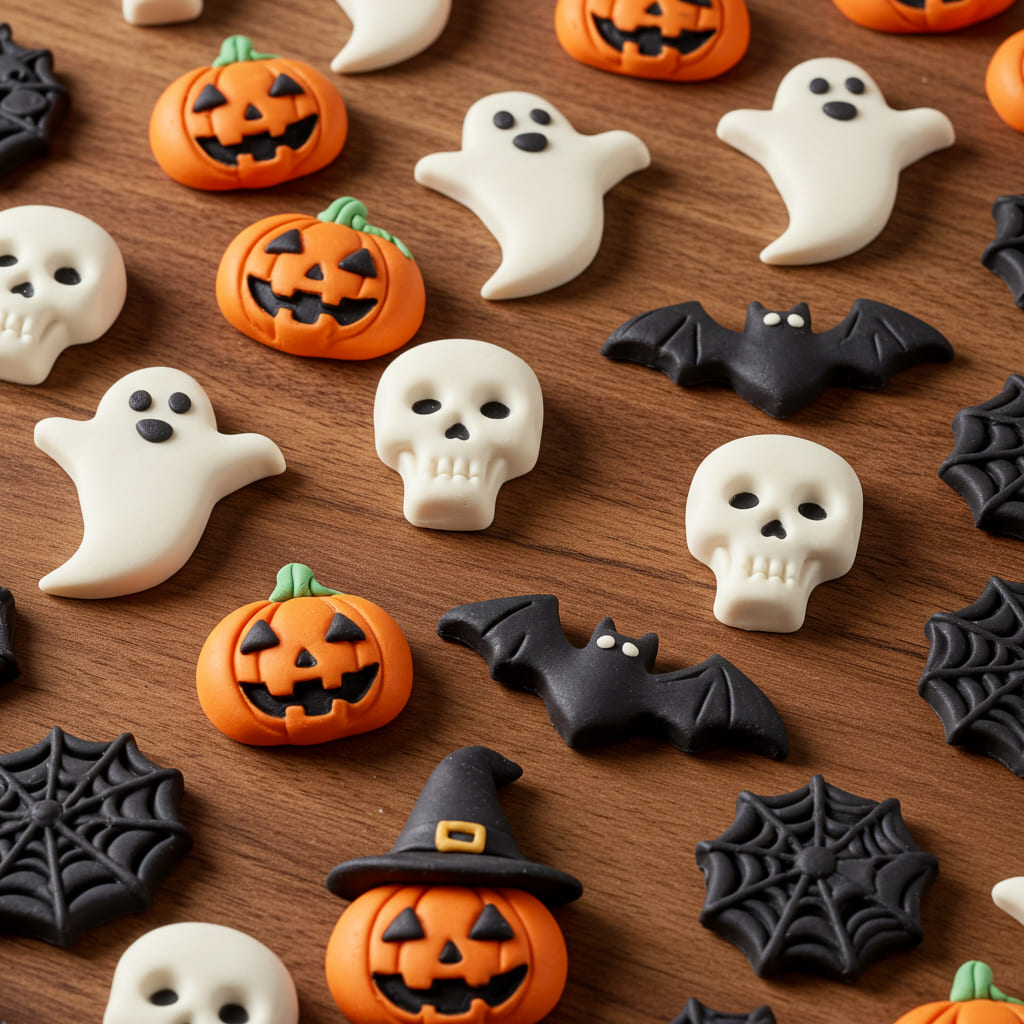
- Roll and cut. Roll out each color to about 1/4-inch thickness on a surface dusted with powdered sugar. Use small cookie cutters or a sharp knife to create your spooky shapes.
- Let them set. Place your finished Halloween fondant toppers on parchment paper and let them air-dry for at least 24 hours. This firms them up so they’re easy to handle.
Storage Instructions
Don’t let your hard work go to waste! Proper storage is key to keeping your decorations perfect.
For short-term, wrap unused fondant tightly in plastic wrap and store it in an airtight container. It will last at room temperature for up to 2 weeks. You can also store completed, dried Halloween fondant toppers this way between layers of parchment paper.
For long-term storage, pop them in the freezer. They’ll keep for up to 3 months and thaw perfectly at room temperature.
Why You’ll Love This Halloween fondant toppers
- Total Crowd-Pleaser: These instantly elevate any cupcake or cake from “nice” to “whoa, you made that?!” The wow factor is real.
- Incredibly Forgiving: Made a mistake? Just ball it up and re-roll. It’s the most stress-free decorating project you’ll ever tackle.
- Perfect for Kids: Get the little ones involved. It’s a fantastic, hands-on activity that keeps them engaged and away from the good candy.
Common Mistakes to Avoid
- Using liquid food coloring. This will make your fondant sticky and sad. Gel coloring is non-negotiable.
- Not greasing your hands enough. You will regret this. The sticky terror is real, people.
- Rolling the fondant too thin. Thicker toppers are sturdier and less likely to break when you handle them.
- Skipping the drying time. If you put a soft topper on a frosted cake, it will absorb moisture and wilt. Patience is a virtue.
Alternatives and Variations
This recipe is a fantastic base for experimentation.
For a vegan version, use Dandies or other vegan marshmallows. You can also explore different flavors by swapping the extract—peppermint is fun for a chilly ghost effect! If you’re making other spooky treats, these toppers pair perfectly with my decadent chocolate cupcakes or a classic vanilla buttercream.
Feeling extra? Add a tiny bit of edible luster dust for a ghostly shimmer.
FAQs
Can I freeze this fondant?
Absolutely! Wrap it tightly in a few layers of plastic wrap and store it in a freezer bag.
It thaws at room temperature in a few hours. This is a great way to prep your Halloween fondant toppers weeks in advance.
What’s the best substitute for gel food coloring?
If you’re in a pinch, you can use powdered food coloring. Avoid liquid at all costs, as it will throw off the texture and make your fondant unusably sticky.
How long do the finished toppers stay fresh?
Once dried, your Halloween fondant toppers will stay perfectly fresh for several weeks when stored in an airtight container at room temperature.
Keep them away from humidity.
Is this project kid-friendly?
100%. It’s like edible play-doh. Kids love kneading the colors and using the cookie cutters.
Just be prepared for a slightly messy, but very fun, kitchen adventure.
Can I prep the fondant ahead of time?
Yes, and you should! The fondant itself can be made, wrapped tightly, and stored at room temperature for up to two weeks before you even roll and cut it. This makes party day so much easier.
For more make-ahead magic, check out my Halloween party planning guide.
Final Thoughts
Don’t let store-bought decorations intimidate you. Homemade Halloween fondant toppers add a personal, spooky touch that everyone will remember. They’re fun, surprisingly simple, and totally worth the effort.
I promise, you’ve got this. Now go make some spooky magic and tell me all about it in the comments!

Ben is a 41-year-old baking educator and former bakery owner from Kansas City, Missouri. With a culinary degree and years of hands-on experience, he specializes in teaching approachable, science-based baking. He once recreated a 17th-century cupcake recipe for a historical food documentary.