
Table of Contents
I almost threw a piping bag across my kitchen. My first attempt at the spiderweb icing technique looked like a toddler’s scribble. Then I cracked the code.
This isn’t some fussy, professional-only wizardry. It’s a simple, stupid-easy method that makes your baked goods look like they came from a high-end patisserie. The best part?
It requires zero artistic talent. I’m going to show you exactly how to master this stunning spiderweb icing technique. Your cupcakes will never be the same.
Why does this specific method for the spiderweb icing technique feel like a cheat code?
It’s the ultimate optical illusion. You create a jaw-dropping design with two simple colors and one piping motion. It taps into that nostalgic Halloween vibe but looks sophisticated enough for any event.
I’ve had people ask if I took a week-long course. Nope. It’s just about knowing the right order of operations.
Have you ever wanted a signature bake that consistently impresses? This is it.
Ingredients
Gathering your ingredients is the first step to icing success. The beauty of this recipe is its simplicity.
You likely have most of this in your pantry right now. The only “special” item is the gel food coloring, which is non-negotiable for vibrant, non-runny webs.
- 4 cups powdered sugar, sifted
- 3 tablespoons whole milk (or heavy cream for extra richness)
- 1 teaspoon pure vanilla extract
- A pinch of fine sea salt
- Gel-based food coloring in black and white (liquid coloring will ruin your consistency, trust me)
Step-by-Step Instructions
- Make your base icing. Combine the sifted powdered sugar, milk, vanilla, and salt in a large bowl. Whip it with an electric mixer until it’s smooth, thick, and holds a peak. This is your blank canvas.
- Divide and color the icing. Set aside one-third of the icing in a separate bowl and keep it pure white. This is crucial for the web’s contrast. To the remaining two-thirds, add your black gel coloring until you achieve a deep, opaque black. No gray allowed.
- Prep your piping tools. Fit two piping bags: one with a small round tip (#3 is perfect) for the black icing, and one with a slightly larger round tip (#5) for the white icing. This setup is the secret to clean lines.
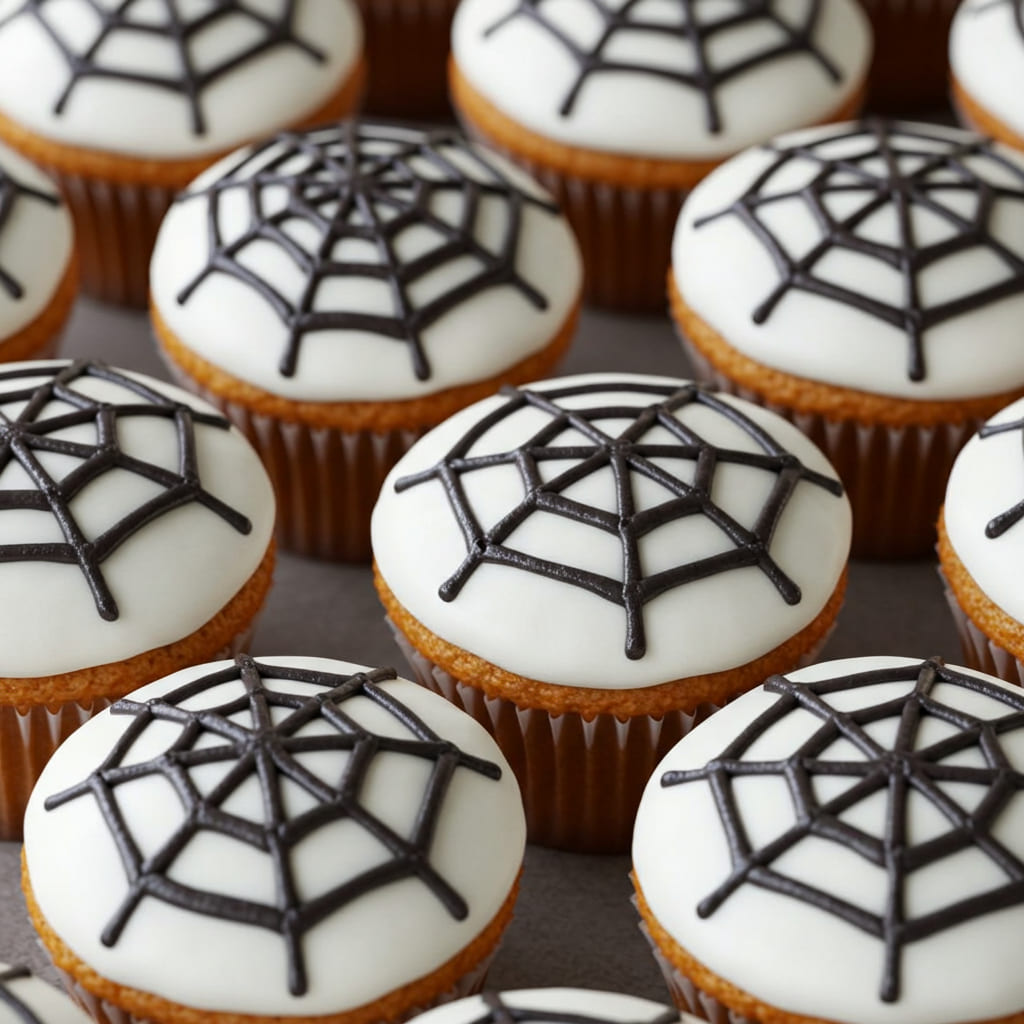
- Pipe the base web. On your cooled cupcake or cookie, use the black icing bag to draw 3-4 concentric circles. Don’t worry about perfection. These circles are the foundation of your spiderweb icing technique.
- Drag the lines. Take a toothpick or a scribe tool. Start from the center and gently drag it straight out to the edge. Wipe the tool clean, and repeat this process every inch or so around the circle. Watch the magic happen as the web forms instantly.
Storage Instructions
Proper storage keeps your hard work looking pristine.
For short-term storage, place iced items in a single layer in an airtight container. They will keep at room temperature for up to 2 days. For longer storage, you can freeze them.
Flash freeze the iced goods on a baking sheet until solid, then transfer to a freezer bag. They will keep for up to 1 month. Thaw at room temperature.
IMO, this makes batch prepping for parties a total breeze.
Why You’ll Love This Spiderweb icing technique
- It’s Deceptively Simple: The process looks complex but takes less than 30 seconds per cupcake once you get the rhythm down.
- Total Crowd-Pleaser: This design never fails to get a “wow” from both kids and adults, making it perfect for any gathering.
- Highly Customizable: You aren’t locked into black and white. Use orange and black for Halloween or pastels for a baby shower.
Common Mistakes to Avoid
- Using runny icing. Your web will turn into a muddy puddle. Ensure your icing is thick enough to hold a peak.
- Dragging the toothpick back through the lines. This is the number one way to smudge your beautiful design. Go from center to edge only.
- Using liquid food coloring. It alters the consistency and dilutes the color, leading to a sad, faded web. Gel coloring is your best friend here.
Alternatives and Variations
This spiderweb icing technique is incredibly adaptable. For a vegan version, use a plant-based butter and milk alternative.
You can also make it with a royal icing for cookies, which dries completely hard. Feel free to experiment with colors—a red and white web is stunning for a Spider-Man theme. If you’re out of piping bags, a sturdy Ziploc bag with a tiny corner snipped off works in a pinch.
FAQs
Can I freeze cupcakes with this icing?
Absolutely!
The icing freezes beautifully. Just make sure they are flash-frozen first so the design doesn’t get smashed. Thaw them uncovered at room temperature to prevent condensation.
What’s the best substitute for gel food coloring?
There isn’t a great one, honestly.
Gel coloring is key. However, in an emergency, you can use a high-quality powdered food coloring, but you’ll need to mix it with a tiny drop of vodka or lemon extract to create a paste first.
How long does the icing stay fresh?
The icing itself will stay soft and perfect for about two days when stored properly. After that, it might start to crust over or dry out, especially if you’ve used a thinner layer.
Is this spiderweb icing technique kid-friendly?
100%.
Kids love the “magic” of dragging the toothpick to reveal the web. It’s a fantastic activity for a baking party. Just be prepared for a little mess!
Can I prep the icing ahead of time?
Yes, you can make the icing up to 2 days in advance.
Keep it in an airtight container in the refrigerator. Let it come to room temperature and re-whip it briefly before using to restore the perfect piping consistency.
Final Thoughts
This spiderweb icing technique has become my go-to for making ordinary bakes extraordinary. It’s fast, fun, and foolproof.
Once you try it, you’ll see how easy it is to create professional-looking designs. I hope this method brings a little magic to your kitchen. Now go grab a piping bag and show off your new skills!
I’d love to see your creations—tag me on social or drop a comment below!

Ben is a 41-year-old baking educator and former bakery owner from Kansas City, Missouri. With a culinary degree and years of hands-on experience, he specializes in teaching approachable, science-based baking. He once recreated a 17th-century cupcake recipe for a historical food documentary.