Scary Halloween Blood Drip Cupcakes Recipe
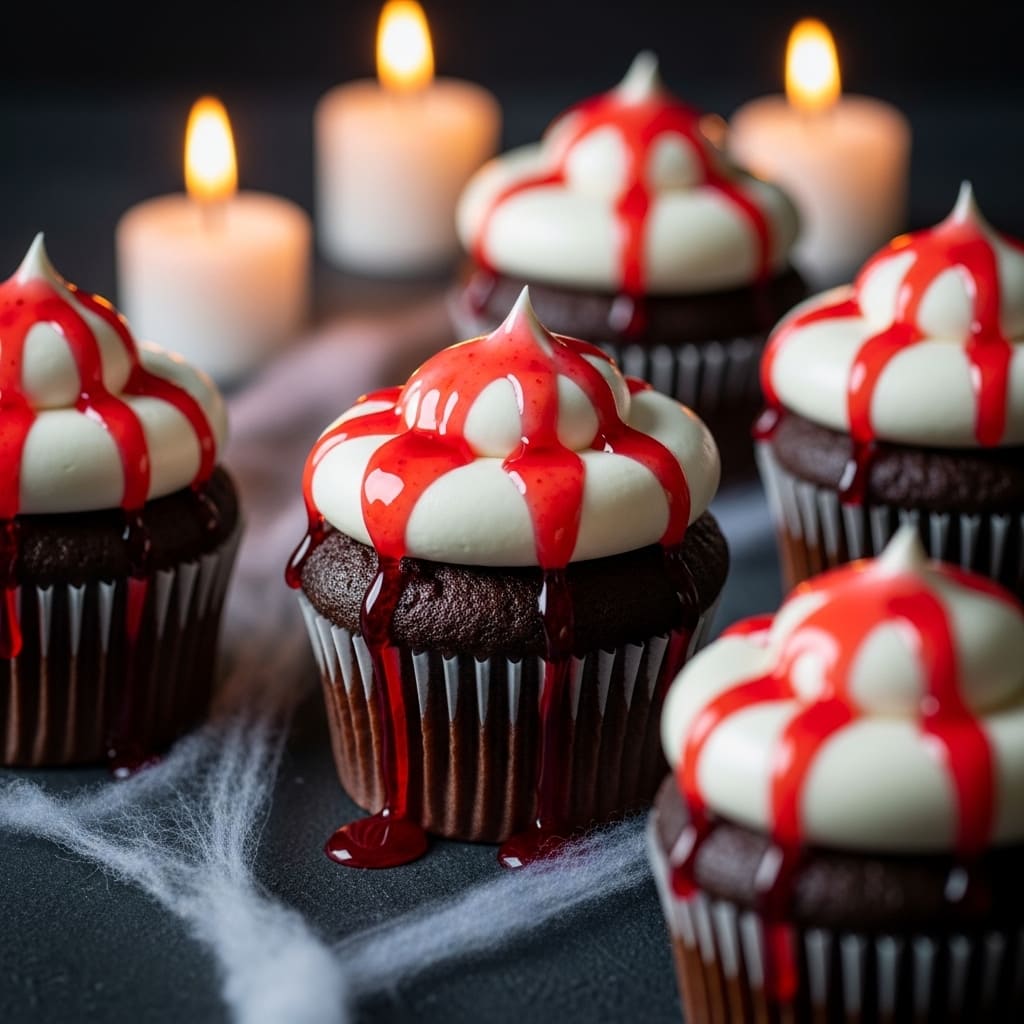
Table of Contents
I almost canceled my Halloween party last year. The reason? Pinterest fails.
My attempts at spooky treats looked more like abstract art gone wrong. Then I discovered blood drip cupcakes, and my entire holiday hosting reputation changed overnight. These aren’t just cupcakes; they’re a conversation starter that looks professionally terrifying but is secretly simple.
The best part? That glorious, glossy blood drip is way easier than it looks. If you can melt candy, you can create this masterpiece.
Let me show you how to become the hero of your next Halloween bash.
What’s the secret sauce? It’s the perfect blend of creepy and delicious. We’re not just making red frosting here.
The magic is in that realistic, slightly translucent blood drip effect. It’s the kind of detail that makes people do a double-take before they even take a bite. I love watching guests’ reactions—they’re equal parts horrified and hungry.
Isn’t that the ultimate Halloween win? It taps into that nostalgic feeling of classic horror movies, but in a totally edible, shareable form. These blood drip cupcakes are the ultimate underrated hero for any spooky gathering.
Ingredients
Gathering the components for these gory goodies is half the fun.
You likely have most of the cupcake basics in your pantry right now. The real star is the “blood,” which requires one specific, quirky item. Don’t worry, it’s not actual vampire essence.
- For the Cupcakes: 1 ½ cups all-purpose flour, 1 cup granulated sugar, 1 ½ tsp baking powder, ½ tsp salt, ½ cup unsalted butter (softened), 2 large eggs, 2 tsp vanilla extract, ¾ cup whole milk.
- For the Vanilla Frosting: 1 cup unsalted butter (softened), 3 cups powdered sugar, 2 tbsp heavy cream, 1 tsp vanilla extract, Red gel food coloring.
- For the Blood Drip: ½ cup white chocolate chips, 2 tbsp heavy cream, 1 tbsp light corn syrup, Deep red gel food coloring.
The corn syrup is the quirky MVP—it gives the blood drip that perfect, sticky-shiny texture you see in movies.
Gel food coloring is non-negotiable for a vibrant, deep red color.
Step-by-Step Instructions
- Bake your cupcakes. Preheat your oven to 350°F and line a muffin tin. Whisk the dry ingredients together, then cream the butter and sugar. Add eggs and vanilla, then alternate mixing in the dry ingredients with the milk. Fill the liners ⅔ full and bake for 18-20 minutes. Let them cool completely. A warm cupcake will melt your frosting into a puddle of sadness.
- Whip up the frosting. Beat the softened butter until it’s light and fluffy. Gradually add the powdered sugar, then the cream and vanilla. Whip it for a good 3 minutes until it’s super smooth. Add a tiny bit of red gel color to create a pale pink base—this makes the final blood effect pop.
- Frost the cupcakes. Use an offset spatula or a piping bag to create a thick, smooth dome of frosting on each cooled cupcake. You want a nice, tall base for the blood to drip down from. I like to make a slight well in the center to hold extra “blood.”
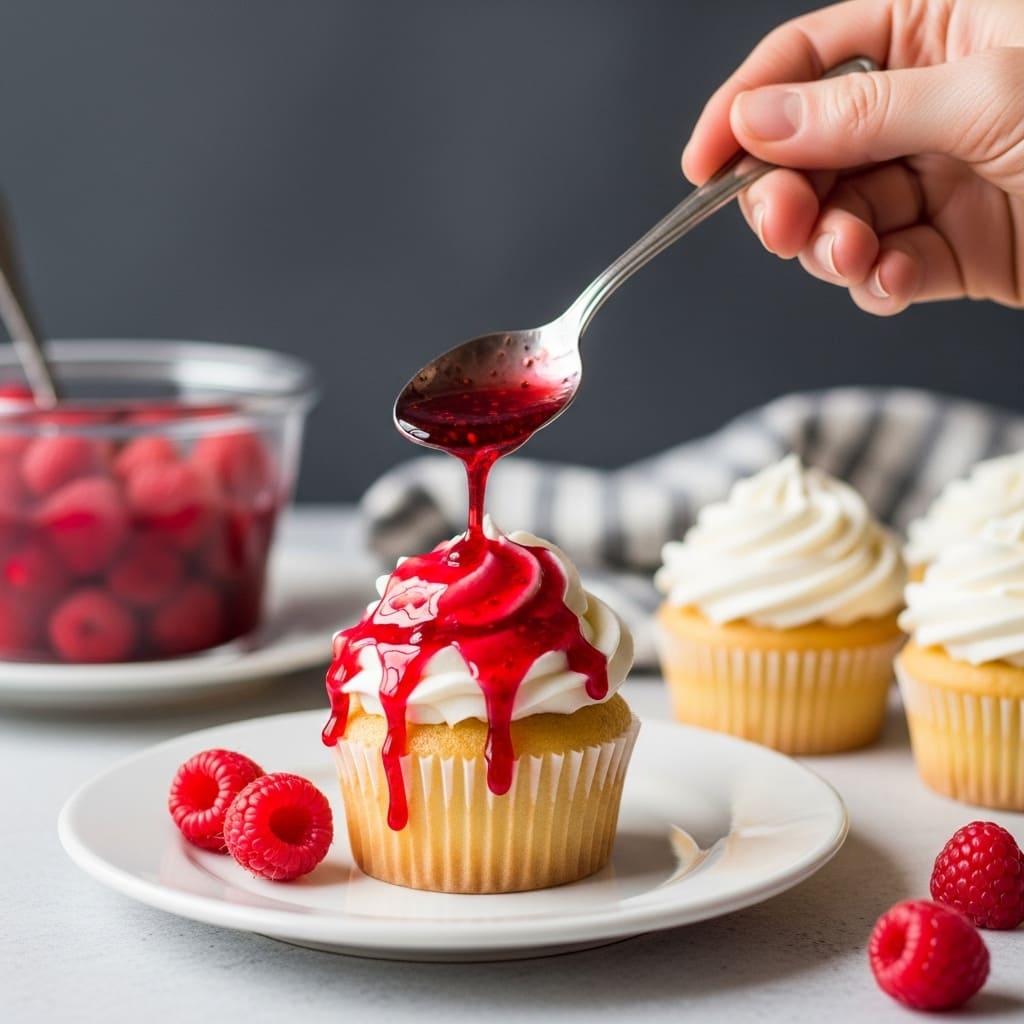
- Create the iconic blood drip. This is the fun part! Gently melt the white chocolate chips with the heavy cream. Stir until smooth, then mix in the corn syrup and a generous amount of deep red gel coloring. Let it cool for about 5 minutes so it thickens slightly. Test the consistency on the side of your bowl; it should slowly drip but not be runny.
- Apply the gore. Use a spoon or a squeeze bottle to carefully drizzle the blood mixture over the edge of the frosted dome. Start from the outside and work your way in, letting it drip naturally down the sides. Pour a little pool of the remaining “blood” in the center. Step back and admire your terrifyingly tasty blood drip cupcakes.
Storage Instructions
These creepy creations are best enjoyed fresh, but you can definitely prep ahead. Store them in an airtight container at room temperature for up to 2 days.
The frosting and drip will stay perfect. For longer storage, pop them in the fridge for up to 5 days. Let them come to room temperature before serving for the best texture and flavor.
You can also freeze unfrosted cupcakes for up to 3 months. Thaw overnight and decorate the day of your event for the freshest, most dramatic effect. Freezing the frosted version is not recommended as it can get messy.
Why You’ll Love This Blood drip cupcakes
- Total Crowd-Pleaser: These are the first thing to disappear at any party. They look incredibly impressive but require zero professional pastry skills.
- Surprisingly Simple: The most complex step is melting chocolate. If you’re looking for more simple but stunning desserts.
- Highly Customizable: Use different cake bases like chocolate or red velvet. You can even make the blood drip vegan with a simple swap.
Common Mistakes to Avoid
- Using liquid food coloring for the blood drip. It will seize your chocolate and create a grainy, broken mess. Gel coloring is your best friend here.
- Applying the drip to warm cupcakes. Your beautiful frosting and blood will slide right off, creating a crime scene on your countertop.
- Making the blood drip too thin. If it’s runny, it will just race to the bottom of the cupcake liner. Let it cool and thicken slightly for perfect, controlled drips.
Alternatives and Variations
Don’t be afraid to get creative with your gore! For a chocolate version, use a devil’s food cake base. To make these blood drip cupcakes vegan, use your favorite vegan cupcake recipe, plant-based butter for the frosting, and vegan white chocolate.
For the blood drip, ensure your corn syrup is vegan-friendly. You can even add a splash of raspberry or cherry extract to the blood mixture for a fruity, metallic tang. For a less sweet option, a cream cheese frosting base works wonderfully.
FAQs
Can I freeze blood drip cupcakes?
You can freeze the unfrosted cupcakes for up to 3 months.
I do not recommend freezing them after you’ve added the frosting and blood drip, as the texture and appearance will suffer upon thawing.
What’s the best substitute for corn syrup?
If you don’t have corn syrup, you can use honey or agave nectar for a similar glossy effect. Just note that it might impart a slight flavor and the color may be a touch darker.
How long do blood drip cupcakes stay fresh?
Stored properly in an airtight container, they are at their best for 2 days at room temperature. You can refrigerate them for up to 5 days, but the cupcake itself may dry out a bit.
Is this recipe kid-friendly?
Absolutely!
Kids go nuts for these. They’re perfect for a Halloween party or a fun, spooky baking project. You can even get them involved in the decorating process.
Can I prep blood drip cupcakes ahead of time?
Yes, this is a great make-ahead dessert.
Bake and frost the cupcakes the day before. Make the blood drip and apply it the day of your event for the freshest, shiniest look.
Final Thoughts
This recipe truly saved my Halloween hosting anxiety.
It proves that with a few simple tricks, you can create a show-stopping dessert that wows everyone. The process is just as fun as eating the final product. I hope these blood drip cupcakes bring as much spooky joy to your table as they have to mine.
Now go make some edible magic—and don’t forget to tag me in your photos!

Lila is a 29-year-old baker and artist based in Asheville, North Carolina. Raised in a cozy, artsy family, she studied visual arts before falling in love with baking. Her signature? Seasonal cupcakes topped with edible flowers from her garden. She hosts backyard baking workshops during the solstices and equinoxes.