Best thanksgiving dessert cupcakes

Table of Contents
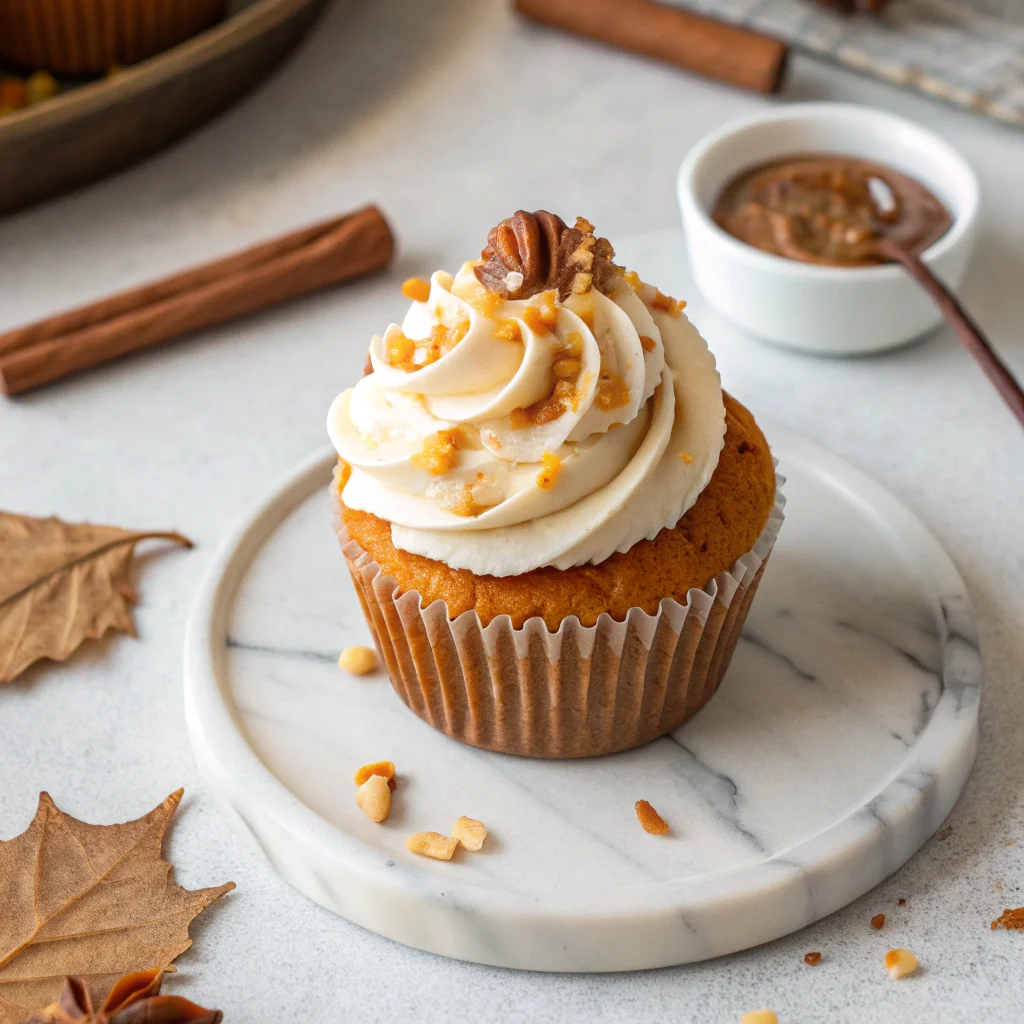
This year, elevate your holiday table with the ultimate thanksgiving dessert cupcakes. These individual treats combine all the cozy, comforting flavors of the classic feast into a single, delightful bite. Imagine the rich taste of pumpkin pie, the sweet crunch of pecan, and the warm spice of apple crisp, all in cupcake form. They are the perfect solution for serving a crowd and a guaranteed hit with guests of all ages. Let’s explore how to create these festive masterpieces that will become your new holiday tradition.
Thanksgiving dessert cupcakes offer a fun and modern twist on the usual pie lineup. They are surprisingly easy to make and incredibly versatile. You can decorate them to look like tiny turkeys, autumn leaves, or simply with a swirl of decadent frosting. Your family will be begging for these adorable and delicious creations year after year.
The Ultimate 5-Step Method for Perfect Thanksgiving Dessert Cupcakes
Mastering the art of the perfect cupcake is simpler than you think. The secret lies in balancing moisture and structure. Overmixing is the enemy of a tender crumb, so fold your dry ingredients gently. For an extra flavor boost, consider toasting your spices beforehand to awaken their aromatic oils.
This technique releases their full potential, filling your kitchen with an incredible holiday scent. Using room-temperature ingredients is another pro tip that ensures a smooth, well-emulsified batter. This prevents curdling and leads to a more consistent bake. For more ideas, check out our guide on Guilt-Free Low Carb Cupcakes That Taste Amazing. You can learn more about the fascinating history and science of baking on this expert baking resource.
Don’t be afraid to get creative with your mix-ins. A handful of chopped pecans or a swirl of cinnamon cream cheese can transform a simple batter. The goal is to capture the essence of Thanksgiving in every single bite.

Ingredients
- 2 cups all-purpose flour
- 1 ½ teaspoons baking powder
- ½ teaspoon baking soda
- 1 teaspoon salt
- 2 teaspoons pumpkin pie spice
- ½ cup unsalted butter, softened
- 1 cup granulated sugar
- 2 large eggs, room temperature
- 1 cup canned pumpkin puree
- 1 teaspoon vanilla extract
- ¾ cup buttermilk
For the Cream Cheese Frosting:
- 8 oz cream cheese, softened
- ½ cup unsalted butter, softened
- 4 cups powdered sugar
- 1 teaspoon vanilla extract
- Pinch of salt
Instructions
- Preheat your oven to 350°F (175°C) and line a muffin tin with festive cupcake liners. This ensures easy removal and adds to the holiday charm.
- In a medium bowl, whisk together the flour, baking powder, baking soda, salt, and pumpkin pie spice. This crucial step aerates the dry ingredients for a lighter texture.
- In a separate large bowl, cream the softened butter and sugar together until light and fluffy. This should take about 2-3 minutes with an electric mixer.
- Beat in the eggs one at a time, followed by the pumpkin puree and vanilla extract. Scrape down the sides of the bowl to ensure everything is fully incorporated.
- Gradually add the dry ingredients to the wet ingredients, alternating with the buttermilk. Begin and end with the dry ingredients. Mix until just combined; do not overmix.
- Divide the batter evenly among the prepared cupcake liners, filling each about two-thirds full. This allows room for the cupcakes to rise beautifully without overflowing.
- Bake for 18-22 minutes, or until a toothpick inserted into the center comes out clean. Let the cupcakes cool in the pan for 5 minutes before transferring them to a wire rack to cool completely before frosting.
Storage Tips
Proper storage is key to keeping your cupcakes fresh and delicious. Always ensure they are completely cool before storing them. For more ideas, check out our guide on vegan apple cupcakes. Any residual warmth will create condensation and make the frosting weep.
For short-term storage, place them in an airtight container at room temperature for up to two days. If your kitchen is particularly warm, it’s better to refrigerate them due to the cream cheese frosting.
For longer storage, you can freeze unfrosted cupcakes for up to three months. Wrap them individually in plastic wrap and place them in a freezer bag. Thaw overnight in the refrigerator before frosting and serving.
7 Incredible Benefits of Choosing Cupcakes This Thanksgiving
Why should you make the switch from pie? The advantages are numerous and compelling. First, portion control is built right in. For more ideas, check out our guide on Witch Cupcakes,Witch,Cupcakes. There’s no messy slicing or serving, which is a huge win for the host.
Second, they are incredibly versatile. You can make a few different flavors to please every palate at the table. From classic pumpkin to spiced apple or even sweet potato, the options are endless.
Third, they are perfect for guests with dietary restrictions. You can easily create a separate batch that is gluten-free or dairy-free. This thoughtful touch ensures everyone feels included in the feast.
- Perfect Portions: No more guesswork with slicing; everyone gets their own perfect dessert.
- Total Versatility: Mix and match flavors and frostings to create a diverse dessert platter.
- Kid-Friendly Appeal: The fun, individual size is a major hit with younger guests.
- Make-Ahead Magic: Bake and freeze them weeks in advance to reduce holiday stress.
- Stunning Presentation: They are a beautiful and modern centerpiece for your dessert table.
- Minimal Cleanup: Compared to slicing and serving multiple pies, cleanup is a breeze.
- Travel-Friendly: They are the ideal dessert to bring to a potluck or Friendsgiving celebration. The science of food presentation shows that visual appeal significantly enhances the eating experience.
5 Common Mistakes to Avoid
Even experienced bakers can make simple errors. Being aware of these pitfalls will guarantee bakery-quality results every single time. For more ideas, check out our guide on oat flour cupcakes. Your thanksgiving dessert cupcakes deserve to be perfect.
- Using Cold Ingredients: Cold eggs and butter don’t emulsify well, leading to a dense cupcake. Always bring them to room temperature.
- Overmixing the Batter: This develops gluten and creates a tough, rubbery texture. Mix until the ingredients are just combined.
- Overfilling the Liners: Filling them more than two-thirds full causes batter to spill over and create a messy, mushroom-top cupcake.
- Frosting Warm Cupcakes: This is a recipe for disaster! The frosting will melt and slide right off. Patience is key.
- Using Old Baking Powder/Soda: These leavening agents lose potency over time. Test them to ensure your cupcakes rise properly.
Alternatives and Variations
If pumpkin isn’t your thing, don’t worry. The world of thanksgiving dessert cupcakes is vast and full of possibilities. A spiced apple cupcake with brown sugar frosting is a fantastic alternative.
For a nutty, decadent option, try a butter pecan cupcake with a caramel drizzle. You can even create a chocolate sweet potato cupcake for a rich and unexpected twist.
For dietary needs, simply swap the all-purpose flour for a 1:1 gluten-free blend. You can also use dairy-free butter and milk alternatives. For more ideas, check out our guide on brown butter cupcakes. The basic method remains the same, making it easy to adapt.
Frequently Asked Questions
Find answers to common questions
Final Thoughts
This holiday season, impress your guests with these unforgettable thanksgiving dessert cupcakes. They are the perfect blend of tradition and innovation, offering a handheld taste of the holiday. I hope this guide gives you the confidence to create a stunning and delicious dessert that steals the show.
Don’t be afraid to put your own spin on the recipes and decorations. For more holiday baking inspiration and classic recipes, check out the vast collection at Food Network’s Thanksgiving hub. Happy baking, and have a wonderful Thanksgiving!

Lila is a 29-year-old baker and artist based in Asheville, North Carolina. Raised in a cozy, artsy family, she studied visual arts before falling in love with baking. Her signature? Seasonal cupcakes topped with edible flowers from her garden. She hosts backyard baking workshops during the solstices and equinoxes.


One Comment